When MS Outlook is used while connected to the Exchange server, all mailbox data on the server is saved locally in a file called Offline Storage Table (OST) file. This file can be viewed as a replica of user’s Exchange mailbox because it stores all records of the account residing on the server, locally. The primary function of this file enters play if the Exchange server experiences downtime due to technical issues or maintenance. In such cases, the users can continue to work with the OST file locally without interruptions and any modifications they make to the account are combined with their Exchange account once the server comes back up.
However, there could be instances where users deal with errors while trying to access their Exchange mailbox data through OST file. Such errors might be triggered due to faulty synchronization between Outlook and Exchange or due to issues with the OST file. Generally, issues within the OST file trigger mailbox access errors. This post clarifies a common OST error, 0x8004010F, and the methods to repair it.
The common error messages that show up while sending or receiving emails through Microsoft Outlook are:
“0x8004010F: Outlook data file cannot be accessed”
or
“0x8004010F: The operation failed. An object could not be found”.
Reasons for “0x8004010F: Outlook data file cannot be accessed” to occur
– Dangerous system error
– Failure on Microsoft Office
– Clash of antivirus with all the software, or Windows Firewall settings.
Let’s check out the methods to fix the error 0x8004010F.
Methods to fix the error 0x8004010F
Before we proceed to methods to fix the error we will have to set up new Outlook Profile. To do so follow the steps below:
Step 1: Locate the Outlook Data File
- Navigate to Start> Control Panel > Mail, and then choose Show Profiles in the Mail Setup.
- Click on Outlook dialog box. Press on your Outlook profile and Click the Properties button.
- Choose the Data Files which open ups the Account Settings.

- Under Data Files, find the current data files.
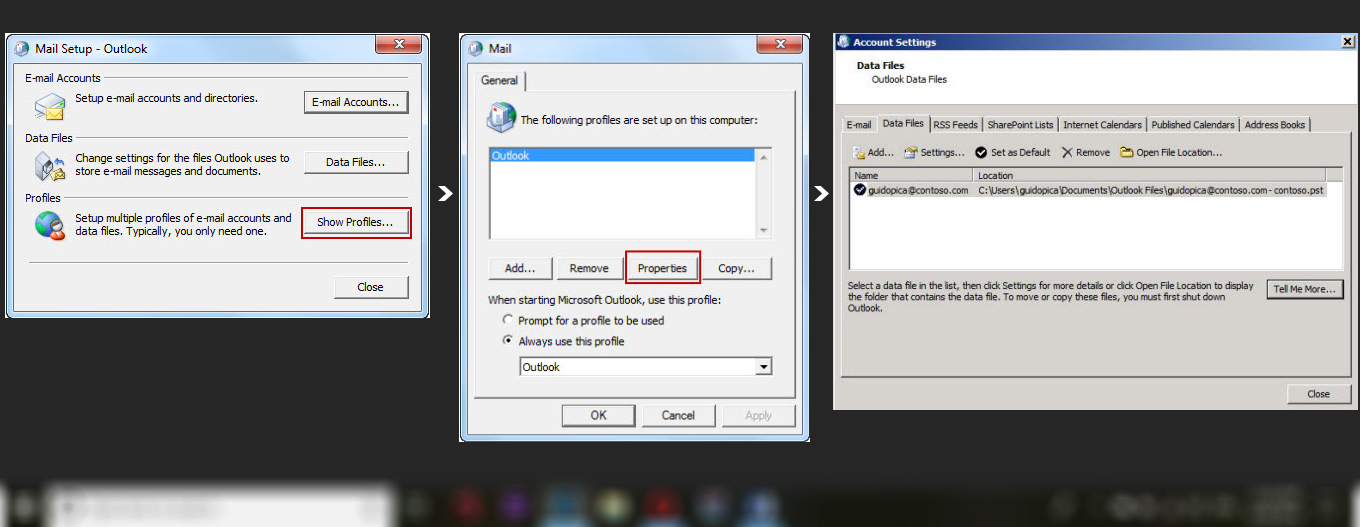
Note down the location of the Outlook data files and save a copy and close it.
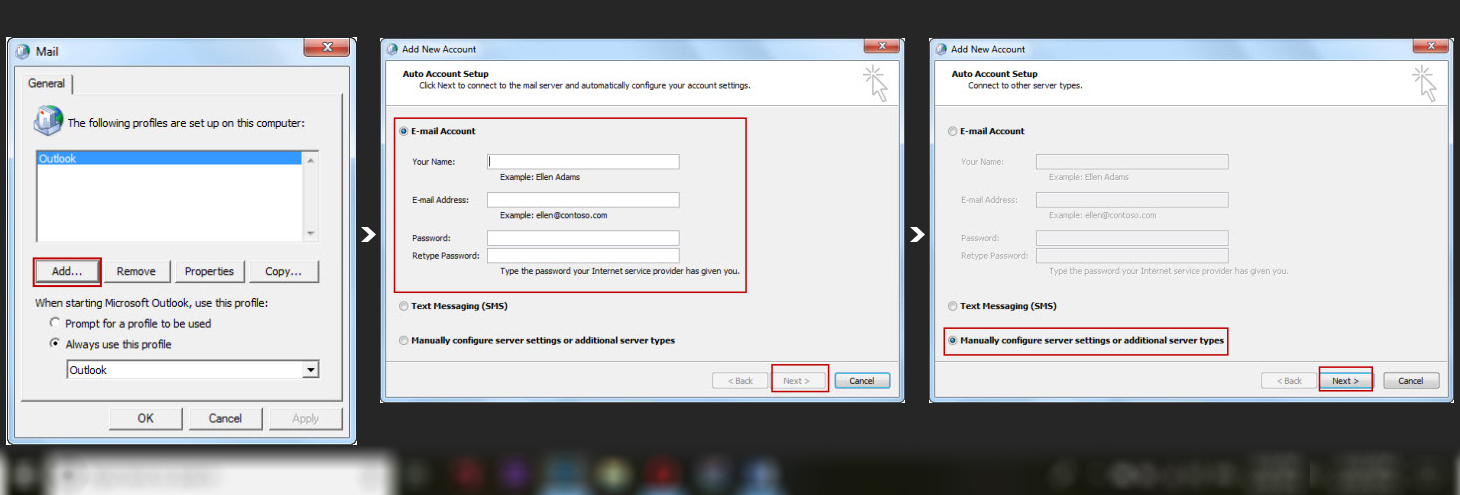
Step 2: Once your data file is found, create a new MS Outlook profile
Procedure 1: Use auto account setup to create an IMAP or POP3 email account.
Procedure 2: Manually create an IMAP or POP3 email account.
Procedure 1: Use auto account setup to create an IMAP or POP3
- Start> Control Panel> click Show Profile in Mail Setup – outlook dialog box
- Click Add in the General tab and enter your new MS Outlook profile name then click OK.
- Now setup a new account by giving your name, email, and password. And Click Next.
- Now a window appears like shown in the below figure. You need to select the Manually configure server settings or additional server types radio button. Now Click Next.
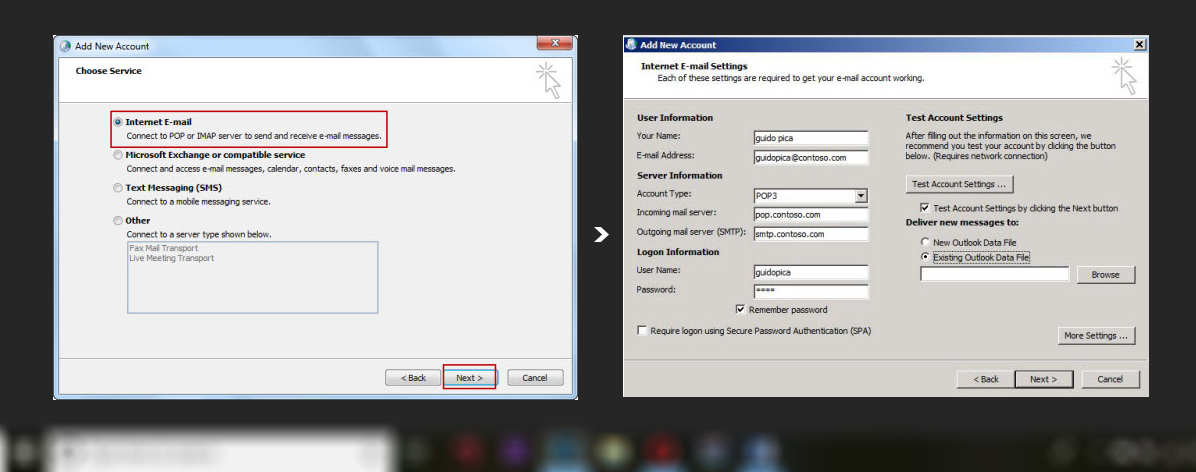
- Then you will be seeing the below window. Now, Choose Internet E-mail and then Click Next
- Type your account details in the Internet E-mail Settings dialog box. (if you are unsure about account details then contact your internet service provider)
- To Test your account, click Test Account Settings in the same window. After that select Existing outlook data file option and then click Browse.
- Now select the previous location of outlook data file.
- Click ok and then click Next.
- From the Test Account Settings dialog box, click Close and click Finish.
Step 3 – Configure new outlook profile as the default profile
Follow the below steps to set the new Outlook profile as the default profile
- From General tab of the Mail dialog box, choose Always use this profile.
- After Selecting the Always use this profile option you will find the drop-down list, from that select the new profile.
- To close the Mail dialog box, click OK.
This will most probably help you to get rid of but if it doesn’t, keep reading.
Method 1: Refreshing Outlook Settings
Many users have multiple Microsoft Outlook email accounts so, creating a new profile might not help them fix the 0x8004010F error. For such users, there’s another way out.
- In Outlook click File -> Account Settings -> Account Settings
- Click Change Folder and expand it by click on the “+” sign adjacent to it.
- Select Inbox and click on New Folder option to create a new temporary folder. Give it a name and then click OK
- Select the folder you’ve just created and click OK. The message delivery location will now show this new folder.
- Now change the temporary folder back to the original location. For this, click on Change Folder again.
- Select Inbox and then click OK.
- Close Account Settings and click send/receive.
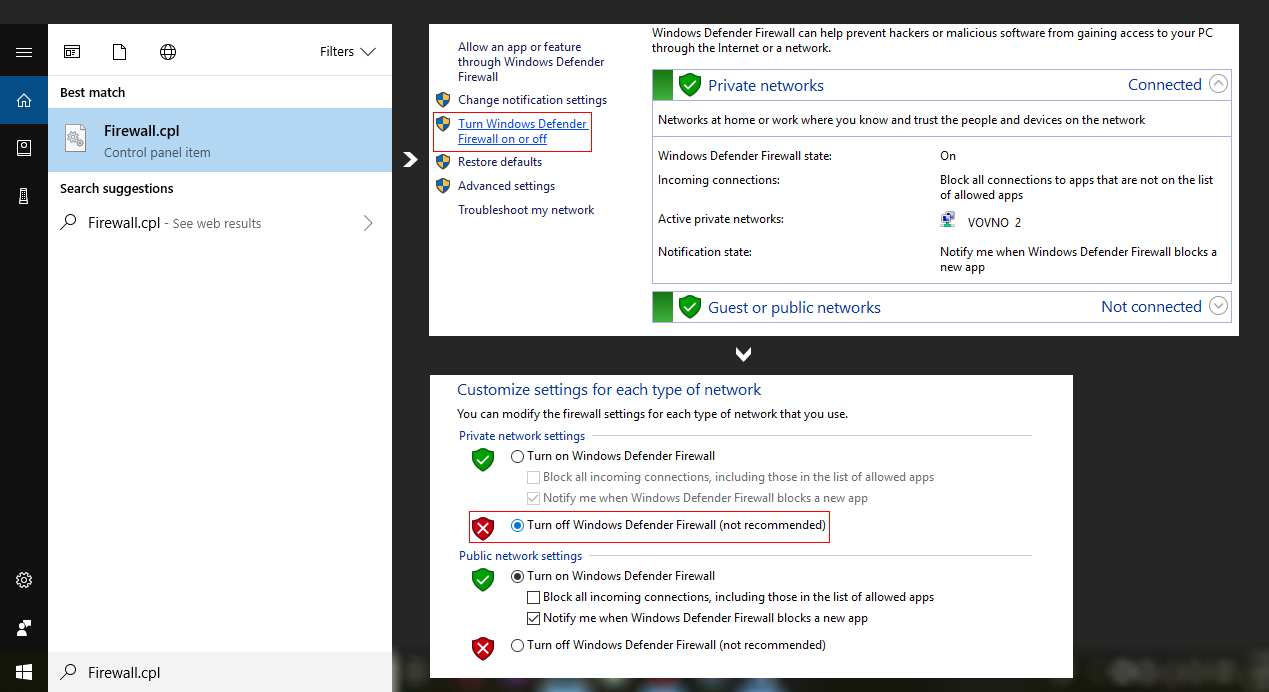
Method 2 – Modify Windows Firewall Settings Temporarily
The next thing that you can try is to modify the settings of Windows Firewall.
- Click Start or Win key, type Firewall.cpl, and press Enter.
- Select Windows Firewall> Find Turn Windows Firewall On or Off
- Now Choose Turn off Windows firewall and click on OKto save settings.
Method 3 – Run sfc/scannow
- Open command prompt as admin and type sfc /scannow and press Enter.
- Let the system perform the repair automatically.
- Reboot the system.


 (305 votes, average: 2.07 out of 5)