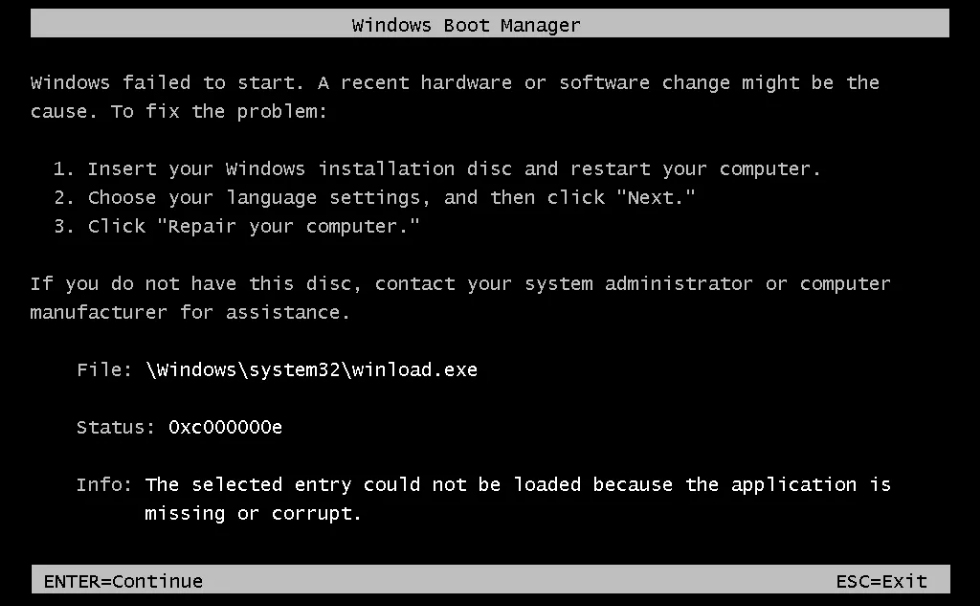
As a part of the system start-up procedure, the BOOTMGR bootloader introduced in Windows Vista and subsequently used in Windows 7, Windows 8(.1 ), and Windows 10 uses a database of entries and configuration options referred to as the BCD, which serves as a worldwide shop for all boot-related options and settings on newer Windows PCs. If an error is experienced trying to load an entry in this BCD file, user can see a screen similar to this:
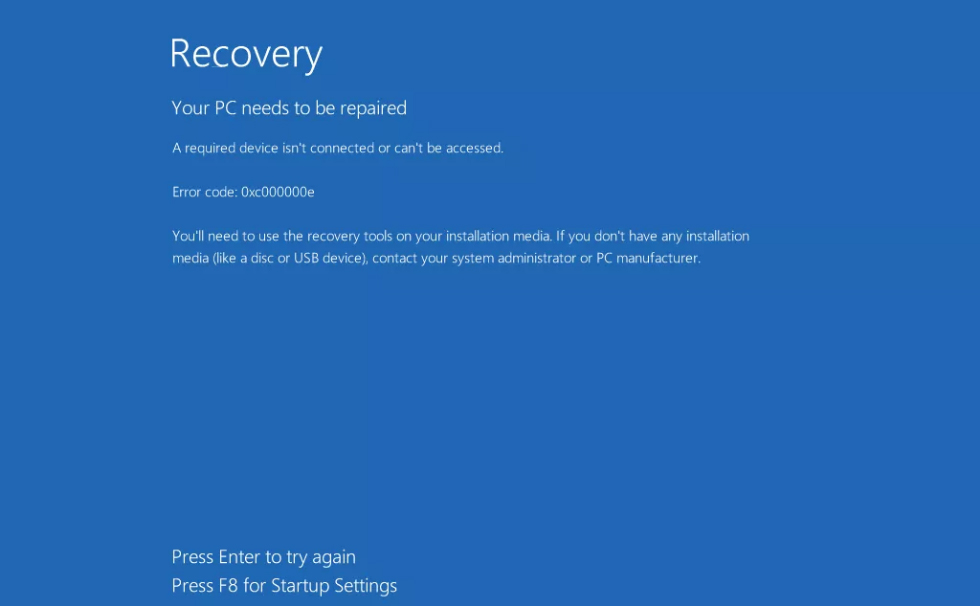
And a screen similar to the image below can be seen in Windows 8, 8.1 and 10:
A boot into your BIOS is needed to change the boot order and make your PC boot from the recovery drive instead of your hard drive. To do that, use the following steps:
- Enter the BIOS or UEFI settings by pressing your motherboard manufacturer’s designated key before Windows boots. This key is usually Esc, Delete, F2, F8, F10, F12 or Backspace, depending on the manufacturer. You can do an online search on how to enter BIOS, followed by your computer model.
- Once inside, navigate to the Boot Use the instructions found within the BIOS to change your boot order, and set either the CD-ROM or the USB port to be the first device, depending on whether your recovery drive is a CD or a flash drive.
- Save your settings and exit.
Method 1: Use Windows’ built-in Automatic Repair
The Windows Automatic Repair may recover certain boot process related errors in some cases and error 0xc000000e is one of those errors. Here are the steps to access the Automatic Repair from an install disc:
- Boot from Windows install disc.
- Click Nextin the setup page after selecting proper language, time and keyboard input.
- Click Repair your computerand select Troubleshoot.
- Click on Advanced options.
- Select Automatic Repairand select your operating system.
Method 2: Rebuild the Boot Configuration Data
To do this, you will need to boot your computer from the recovery drive. If you’ve configured your BIOS, you can do that by pressing any key once the prompt appears on your display. Once the computer is booted from the recovery drive, use the following steps to rebuild the BCD:
- In the Windows Setup dialog box, set everything to the appropriate values, select your language and click.
- In the lower left corner, click on Repair your computer, and choose Troubleshoot from the Choose an option screen.
- In the Troubleshoot screen, click Advanced Options,and click on Command Prompt.
- When the Command Prompt opens, type the following commands, pressing Enter on your keyboard after each one of them:
bootrec /scanos

bootrec /fixmbr

bootrec /fixboot

bootrec /rebuildbcd
5. Reboot your computer, and it should boot up just fine, without facing the issue again.
Method 3: Repair your OS with the recovery drive
This method will also repair your OS with the command prompt of the recovery drive, and you should be able to boot into Windows without facing the issue again. Boot from the recovery drive, and follow the instructions below.
1. Use steps 1 through 3 from the previous method to get to the Command Prompt of the recovery drive.
2. Once inside the Command Prompt, type the commands below, followed by an Enteron your keyboard to execute them. The StartRep.exeutility corrects boot environment values and should fix the BCD error. Note that you might need to repeat this step multiple times in case it fails.
cd x:\sources\recovery
StartRep.exe
3. If the previous step of repairing Windows didn’t help, type bcdedit in the Command Prompt, to see the values for the Windows Boot Manager.
4. Note the values for Device. If they are unknown, type the following commands, each followed by an Enter to execute them. Note that you should replace C: with the partition where your operating system is installed, if necessary.
bcedit /set {DEFAULT.EN_US} device partition=c:

bcedit /set {DEFAULT.EN_US} osdevice partition=c:

bcedit /set {BOOTMGR.EN_US} device partition=c:
5. When the Command Prompt is done, close it, remove the recovery drive and reboot your system. It shouldn’t have any issues booting up now.
Method 4: Check your disk with CHKDSK utility
If the hard drive has its file integrity compromised, it is possible to use built-in Windows CHKDSK utility to scan the disk and fix the file system errors.
Here are the steps to run CHKDSK:
1. Boot from your Windows install disc.
2. Click on Repair your computer after selecting proper language, time and keyboard input.
3. Select the Windows installation drive, which is usually C:\ , and click Next.
4. Choose Command Prompt when the System Recovery Options box appears.
5. Write “chkdsk C:\ f” and press Enter.
Replace C: with the letter of the driver where Windows is installed.

 (48 votes, average: 4.59 out of 5)