Task manager displaying 100% disk usage is just a sign that some program is forcing your hard disk to over work which leads to a laggy computer and it becomes really difficult to work on it. But if you think that it’s something you did cause this problem, then don’t worry you’re not responsible for this. This problem is fixable and here’s how.
Methods to fix 100% disk usage in Task Manager
Method 1: Update your Device Driver
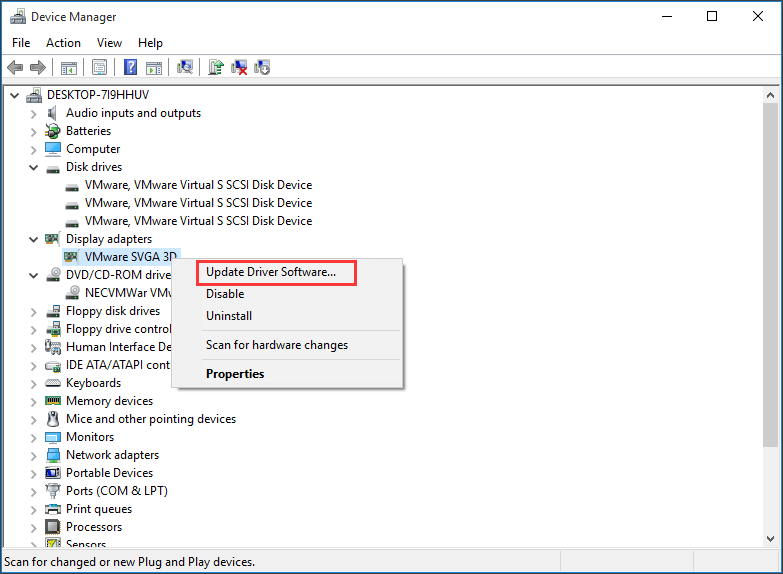
- Press Windows + X and select Device manager.
- In the Device manager window expand Display adapters.
- Right click on the driver you wish to update and select Update Driver.
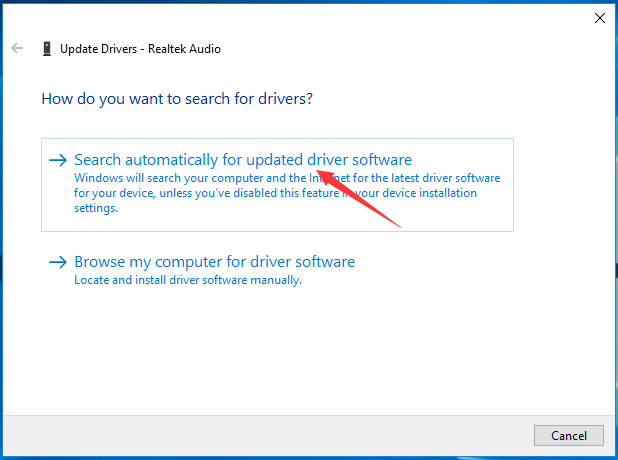
- Select Search automatically for update driver software.
- This might solve the 100% disk usage problem.
(Note: The steps above show how to update display adaptor drivers but these steps can be used to update any driver.)
- Windows will automatically install the updates, if there is any.
Method 2: Run CHKDSK
- Type cmd in the search box and select Command Prompt, right click on it and select Run as administrator.
- Type chkdsk/f/r and press Enter.
- Type “Y” in response to the resultant notification.
- Restart your computer.
Method 3: Disable SuperFetch
- Press Windows + X keys simultaneously and select Command Prompt (Admin).
- Click Yes at the User Account Control prompt.
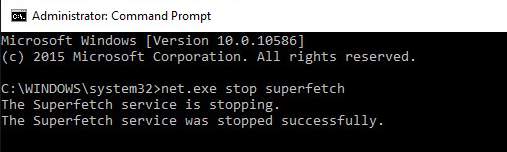
- Command prompt windows will be launched. Type the command:
net.exe stop superfetch
- Press Enter.
- Now start the task manager and have a look at the disk usage.
Method 4: Virtual Memory Reset
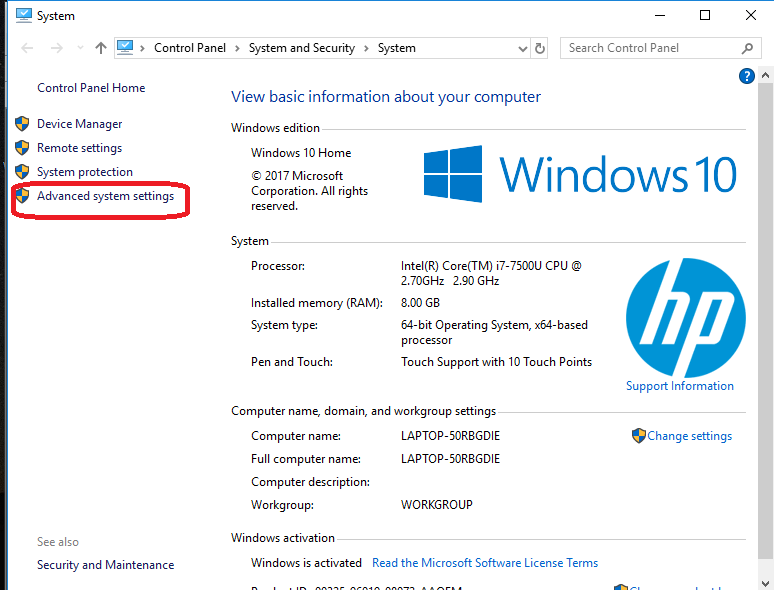
- Type control in the search box and select Control Panel.
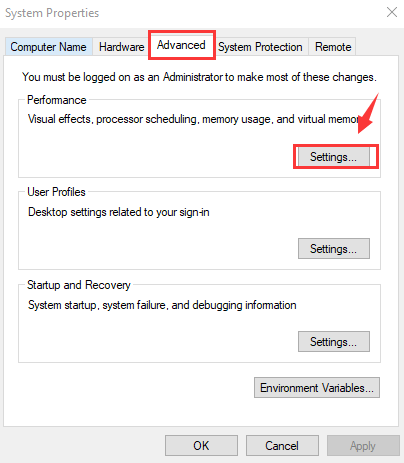
- Select Advanced system settings from the left pane.
3. Go to Advanced tab and click on Settings.
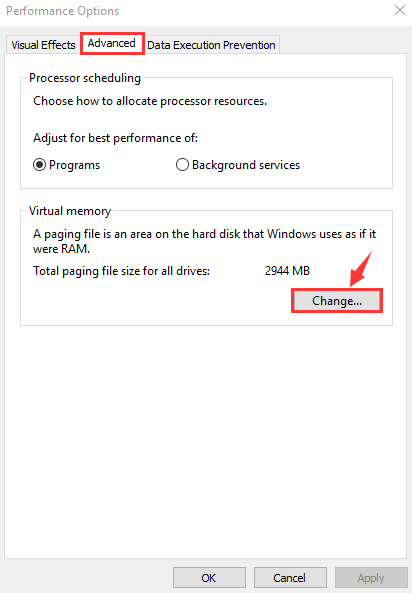
4. Again go to Advanced tab and select Change… under Virtual memory section.
5. Uncheck Automatically manage paging file size for all drives.
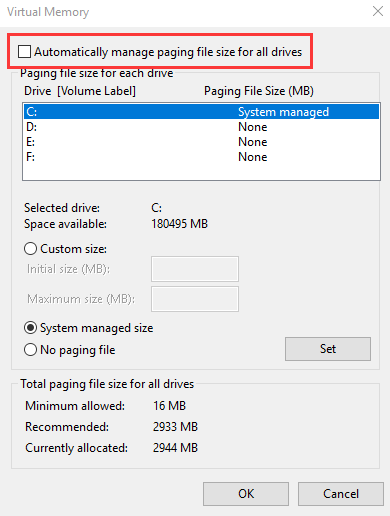
6) Select your windows drive (the hard drive or partition that has Windows installed on it – usually C:), and enter an Initial size and Maximum size for your virtual memory:
Initial size – This value varies, depending on your computer. If you’re not sure what value to use, just enter whatever the number is in the Recommended category.
Maximum size – Don’t set this value too high. It should be about 1.5 times the size of your physical RAM. e.g. A PC with 4 GB (4096 MB) of RAM should have no more than about 6,144 MB virtual memory (4096 MB x 1.5).
Once you’ve entered your virtual memory values, click Set, then click OK to continue.

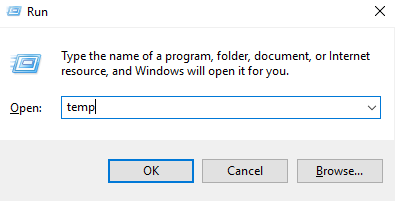
7) Clear all your computer’s ‘temp’ files. On your keyboard, press Windows key and R at the same time, then in the Run form, type temp and hit Enter. This will invoke Windows Explorer with your Temp folder open, showing you all the temp files on your computer.
8) Select all the files in the Temp folder and delete them.
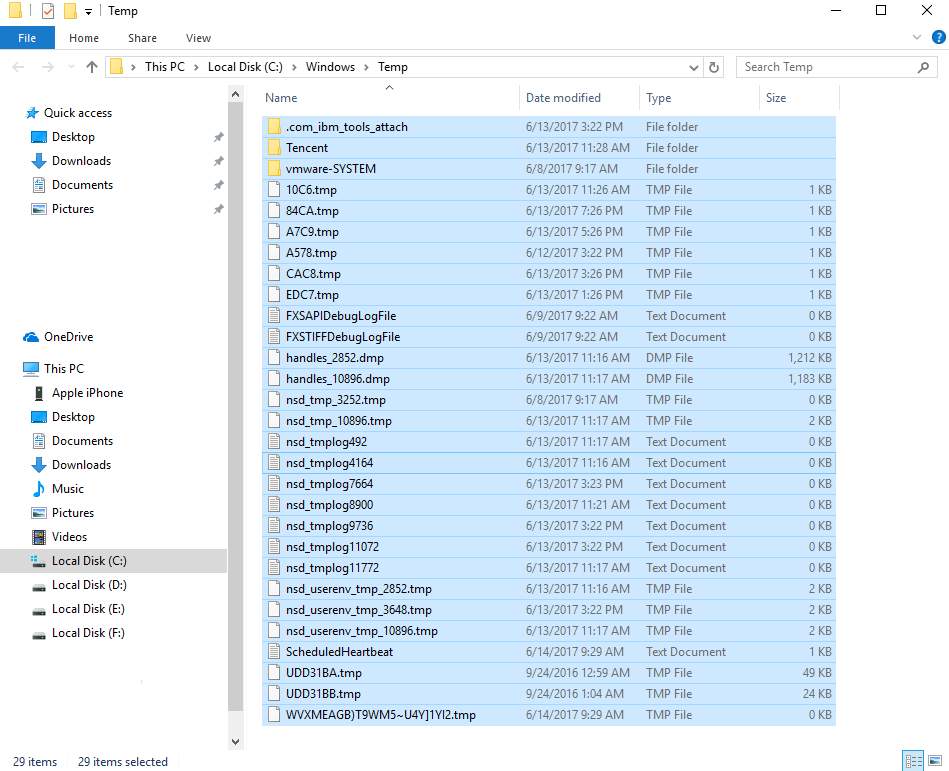
9) Check your computer’s disk usage: Type “task manager” in the Windows search bar and select Task Manager, then in the Processes tab, look at the % at the top of the Disk column. If it’s no longer 100%, you’ve fixed the problem!
Method 5: Repair the StorAHCI.sys driver
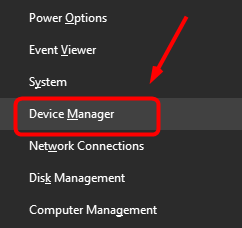
1) Press Windows + X keys at the same time to launch the device manager.
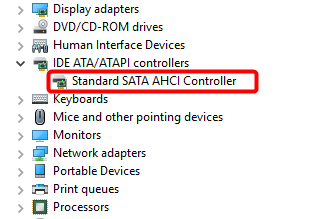
2) Extend the IDE ATA/ATAPI Controllers category and double-click the AHCI controller.
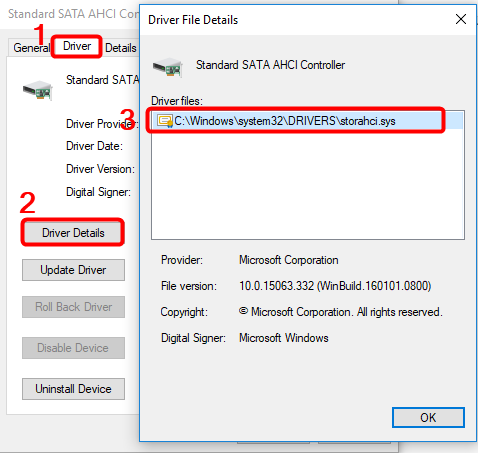
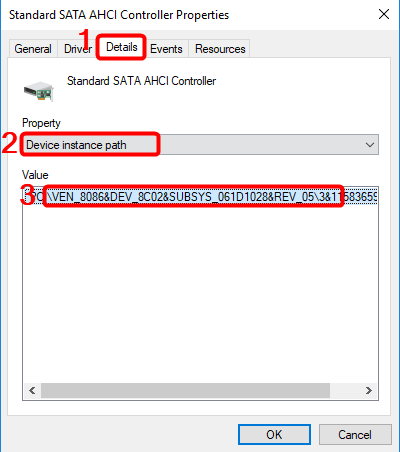
3) Select Driver Details in the Drivers tab. If you spot storahci.sys stored in a path of system32 folder, that means the inbox AHCI driver is running.
4) Close the Driver Details window and go to Details tab. From the drop-down menu, select Device Instance Path. Make note of the path, starting from VEN_.
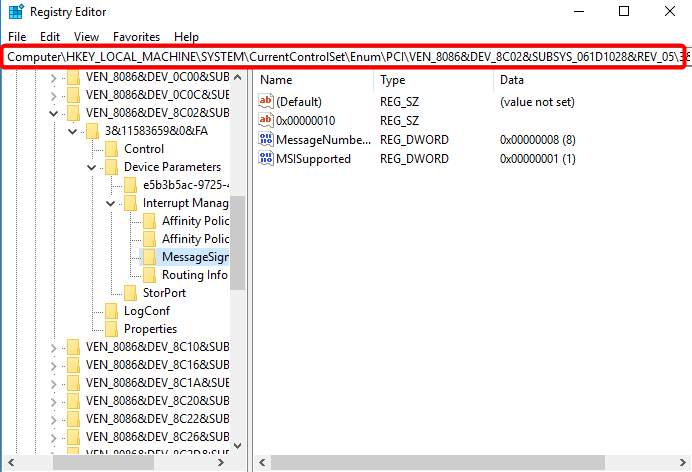
5) Search regedit in the search box of Start panel and hit Enter to launch Registry Editor. Then go to:
HKEY_LOCAL_MACHINE\System\CurrentControlSet\Enum\PCI\ <AHCI Controller>\<Random Number>\Device Parameters\InterruptManagement\MessageSignaledInterruptProperties
The <AHCI Controller> here refers to the name you see from step 2).
The <Random Number> differs on different machines.
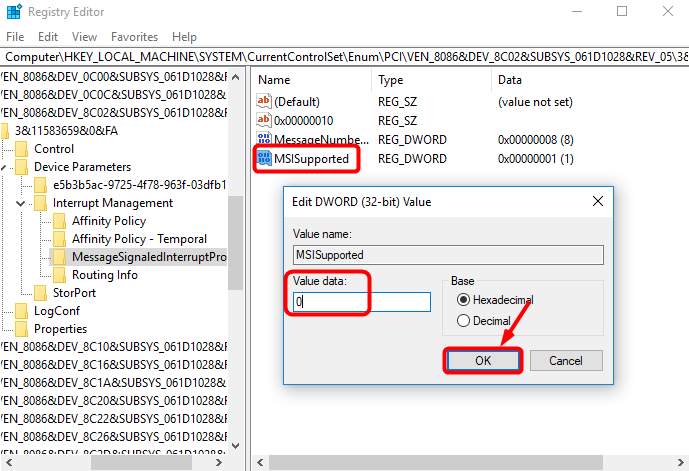
6) Double click the MSISupported key and change the value to 0.
7) Now check the disk usage.
Method 6: Change your Google Chrome & Skype settings
1) Click the three-dot icon at the top right corner in Google Chrome and select Settings.

2) At the very bottom of the page, click Advanced.

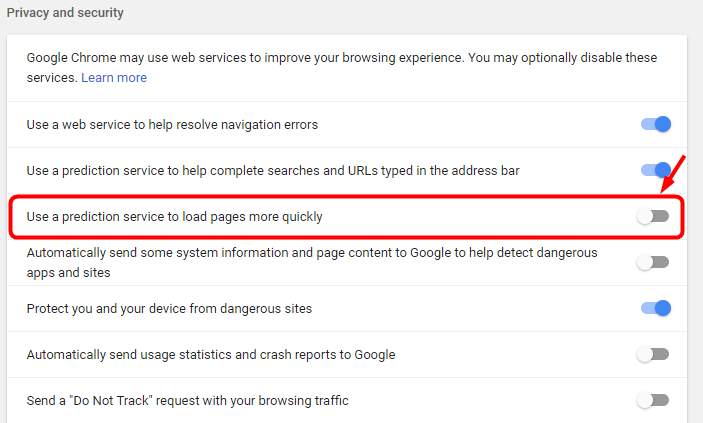
3) In the Privacy and Security category, ensure that “Use a prediction service to load pages more quickly” is turned off.
4) Ensure that your Skype is not closed.
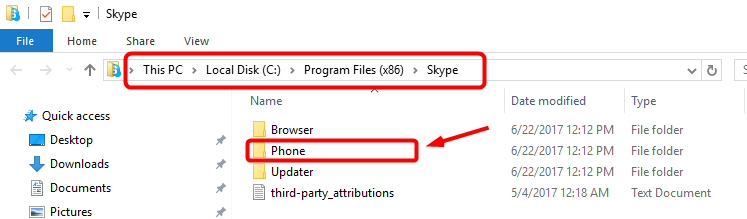
5) Now navigate to C:\Program Files (x86)\Skype\Phone\.
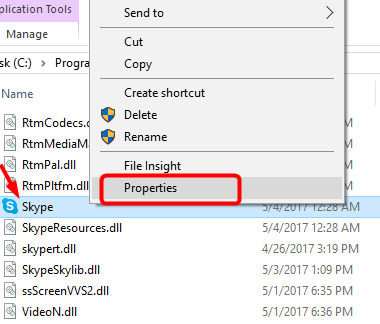
6) Right-click Skype.exe and select Properties.
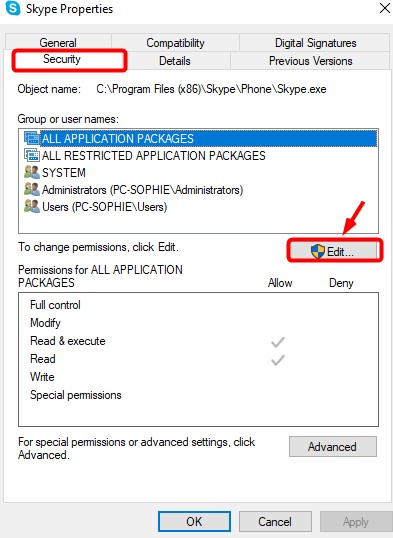
7) Click on Security tab and choose Edit.
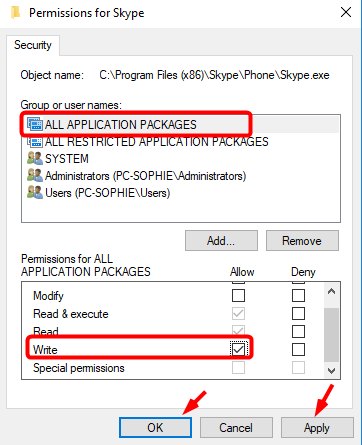
8) Click ALL APPLICATION PACKAGES and tick the Allow checkbox for Write. Then click Apply, then OK to save your change.
9) Now check the disk usage.

 (9 votes, average: 2.00 out of 5)