The IRQL_NOT_LESS_OR_EQUAL error is caused by both software and hardware issues. The message suggests that a kernel-mode process or driver tried to access a memory address that it did not have the rights to gain access to.
The IRQL NOT LESS OR EQUAL error is a generally BSOD error in systems and it occurs more often when Windows users attempt to update their systems into a new version.

IRQL_NOT_LESS_OR_EQUAL Error
In some cases it also occurs when you’re playing games in Windows 10, and frequently getting IRQL_NOT_LESS_OR_EQUAL blue screen error, I know it can be extremely irritating. This error is primarily caused by faulty drivers, which are programmed to gain access to improper hardware addresses.
Causes for IRQL_NOT_LESS_OR_EQUAL
Knowing reasons for irql_not_less_or-equal error will be really useful for us to stop and discover relative solutions for this issue. Here below are some notable reasons for this error:
- Incompatible device drivers;
- Poor device driver installation;
- Faulty hardware;
- Disk fragmentation;
- Registry issues;
- Viruses and malware attack.
What issues will the irql_not_less_or_equal error cause to your computer system? The most severe issues should be system crash, system failure as well as data loss and so on.
Solutions for IRQL_NOT_LESS_OR_EQUAL
There are three solutions to fix this blue screen error. You might not need to attempt them all. Simply work your way down at the top of the list up until you find the one that works for you.
- Repair Registry and Fragmented Disk
- Roll Back Drivers
- Run Hardware Diagnostic
- Repair your registry to fix corrupted files
- Uninstall the problem drivers
- Disable Memory Caching
- Scan and Remove malware in PC
- Update the drivers
- Perform a System Restore
- Perform a Clean Windows install
Before trying any of the above methods, one should open the windows in safe mode.
Start your computer in Safe Mode
The easiest method for booting into Safe Mode is to use the System Configuration tool, also known as msconfig.exe.
- Go to run type msconfig and hit run.
- Go to the Boot tab and, in the Boot options section check the box that says “Safe boot“. Then, click or tap OK.
Here are the steps to follow to start your Windows XP, Vista or Win 7 in Safe Mode
Immediately after the computer is powered on or restarted tap the F8 key in 1-second intervals.
Here are the steps to follow to start your Windows 10 computer in Safe Mode
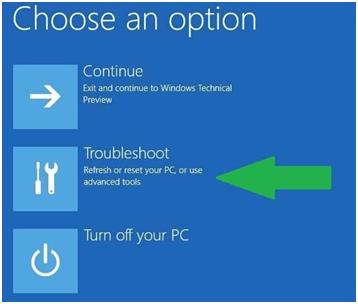
- Hold down the shift key and click the on-screen power button
- Select the restart option while holding the shift key
- Select Troubleshoot > Advanced options > Startup Settings > hit Restart
- Wait until Windows 10 reboots, and select Safe Mode.
- Check if the problem persists.
Repair Registry and Fragmented Disk
1. Press F8 to enter Safe Mode and choose Repair My Computer > Enter Command Prompt in Advanced Options under Troubleshoot;
2. Select Command Prompt and type below commands to find the root directory:
dir C:\Win* and hit Enter;
dir D:\Win* and hit Enter;
dir E:\Win* and hit Enter;
3. Type:
cd /d C:\windows\System32\config+ hit Enter;
xcopy *.* C:\RegBack\+ hit Enter;
cd RegBack + hit Enter;
dir + hit Enter;
4. Type below commands:
copy /y software ..
copy /y system ..
copy /y sam ..
And then click yes. Finally, reboot computer, the registry will be manually fixed and repaired.
Roll Back Drivers
- Go to Control Panel > Double-click the system icon and locate the System Properties;
- Click hardware tab > click Device Manager > locate the device you recently installed and double click it;
- Click the driver tab and the rollback driver button.
Run Hardware Diagnostic
- Type: Memory Diagnostic in the search and enter this tool;
- Click Diagnostic your memory problems and it will ask you to perform the check by restarting PC immediately or on the next restart;
- Scan on the memory and it will display a list of problematic errors which were detected during the scan.
- Finally, you can replace all faulty hardware detected in the scan and reboot PC.
Repair your registry to fix corrupted files
File corruption issues may also cause the irql_not_less_or_equal error. Due to which, you can fix it by repairing your registry. The quickest way to do that is by using the System File Checker command in Command Prompt:
1. Go to Start and type cmd, right-click Command Prompt and select Run as Administrator
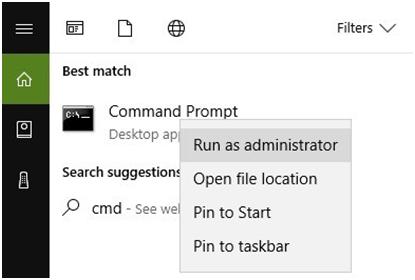
2. Now type the sfc /scannow command
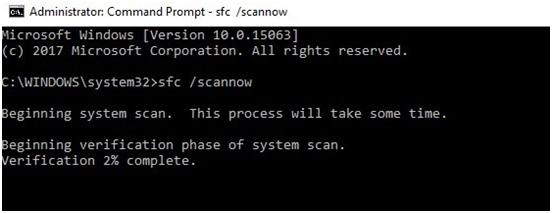
3. Wait for the scanning process to complete and then restart your computer. All corrupted files will be replaced on reboot.
Uninstall problem drivers to fix IRQL_NOT_LESS_OR_EQUAL
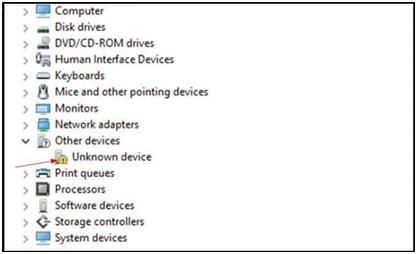
The problem can be caused by faulty drivers. To fix the issue, go to Device Manager and find the faulty drivers, then uninstall the drivers. If a driver is having issues, you’ll see a yellow mark next to its device.
Following steps are for your referral on the best ways to uninstall a driver:
- Press Win+R (Windows logo key and R key) at the same time to invoke the run box.
- Type devmgmt.msc and click OK. Then Device Manager window will open.
- In Device Manager, locate the faulty driver. If the driver is having problems, you’ll see a yellow mark next to the device name. Then right-click on the device name (For example, uninstall graphics card driver.) and select Uninstall.
- If prompted to confirm the uninstall, check the box next to “Delete the driver software for this device.” then click the OK button. If you don’t see this box, just click OK to uninstall the driver.
- Restart your PC and check to see if the blue screen is gone.
Disable Memory Caching
Press F2 or other keys > Enter BIOS > Disable Memory caching feature.
Scan and remove Malware in PC
To perform this method, you have to use some anti-virus software to scan and thoroughly remove all Malware from your PC then reboot the computer. The irql_not_less_or_equal error will be gone.
Update the drivers to fix IRQL_NOT_LESS_OR_EQUAL
The problem can be caused by missing or corrupted drivers. To fix the problem, update the drivers. Device manufacturers create these drivers, and you can obtain drivers straight from the manufacturer of your devices.
Search for your drivers manually on the manufacturer’s website or Google “Your Hardware Manufacturers name”+ “Drivers”. The good news is that you don’t have to do most of this. Windows—especially Windows 10—automatically keeps your drivers reasonably up-to-date for you.
Perform a System Restore to fix IRQL_NOT_LESS_OR_EQUAL
The last solution that you can attempt is doing a system restore. If your System Protection is switched on, Windows will create a restore point before you install the driver. Then you can follow these steps to restore the driver to an earlier version to fix this issue. System Restore enables your system to return to an earlier state. So some content of your system, like system settings, some programs, the registry, will be impacted. However, your individual files and data will not be altered.
- Press Win+ R (Windows logo key and R key) at the same time to invoke a run box.
- Type rstrui.exe and click OK. The System Restore Window will open.
- Click next then you might see the following screen. Select a restore point produced prior to the error occurred. You can distinguish the created Date and Time. Click next to continue and follow the on-screen instructions to complete the restore.
- Restart your PC and check to see if the blue screen is gone.
Perform a clean Windows install
If everything else fails, and the error still appears after you have actually tried all options, the only thing left to do is to carry out a clean Windows install. This means you will need a Windows setup disk or USB drive and you will delete everything on your C: drive and install a fresh version of your Windows, however as mentioned, this should be left as a last option.

 (52 votes, average: 4.71 out of 5)