This problem is a common issue in Windows 10. When you are installing NVIDIA drivers, if you get this error “NVIDIA Installer failed” attempt solutions to repair it.
The main reason for Nvidia driver installation failed is, after updating your system, Windows will automatically try to download the most up to date GPU drivers in the background, which normally takes about 5-10 mins to complete. So, throughout this process trying to install the drivers manually makes you experience Installation failed error.
People that have been seeing the “NVIDIA Installer failed” issue the most are Windows 10 users as Windows 10 appears to have a quite rough relationship with the drivers for NVIDIA’s GPUs. Fortunately, however, there is a whole lot that can be done to try and handle the “NVIDIA Installer failed” problem and obtain the drivers to install properly. The following are among the most efficient methods that you can make use of to try and eliminate the “NVIDIA Installer failed” problem and successfully install the drivers for an NVIDIA GPU.
Fixing Error “NVIDIA Installer Failed”
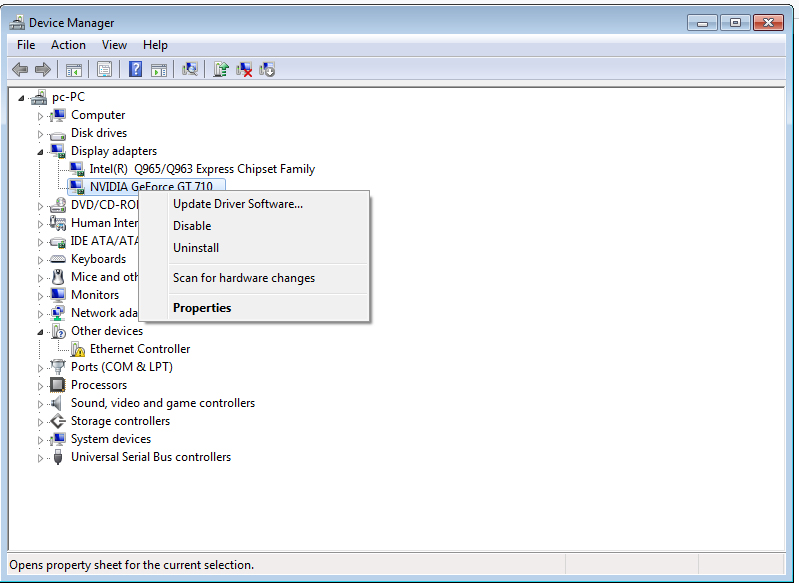
Method 1: Update Driver through Device Manager.
- Right click and use Update Driver Software on the Display or Standard VGA Graphics Adapter from your device list.
- Point to the path of the extracted NVIDIA driver folder (eg. C:\NVIDIA\DisplayDriver\xxx.xx\windows_version\English\Display.Driver). If this folder does not exist, you have never run the installer before.
- Restart PC as soon as it’s done.
Continue to run the NVIDIA installer once again as usual if the video card has been successfully recognized.
Method 2: Temporarily turn off any security programs.
If you are using any type of third-party security programs (such as antivirus programs, anti-malware programs or Firewall programs), they might be obstructing the NVIDIA Installer, triggering you to encounter the “NVIDIA Installer failed” screen each time you run the Installer. If that is the case, you have to:
- Turn off each and every single one of the third-party security programs that you have on your computer. Make sure that none of your third-party security programs are still running. In order to do so,
- Press Ctrl + Shift + Esc to launch the Task Manager.
- Navigate to the Processes tab and, one by one, locate each and every single running process associated with a third-party security program on your computer.
- Click on it to select it and click on End task to shut it down.
Run the NVIDIA Installer. Be sure to perform a Custom install of the drivers (as described in Method 1), and the NVIDIA drivers should be installed successfully.
Method 3: Kill All NVIDIA processes and delete the related files.
- Go to Task Manager. In the Processes tab, end tasks of any running NVIDIA software.
- Delete following NVIDIA files if existed (You might be required to log in as administrator to delete the files):
C:\Windows\System32\DriverStore\FileRepository\nvdsp.inf file
C:\Windows\System32\DriverStore\FileRepository\nv_lh file
C:\Windows\System32\DriverStore\FileRepository\nvoclock file
C:\Program Files\NVIDIA Corporation\
C:\Program Files (x86)\NVIDIA Corporation\
- Reboot the system then install the driver again. Please select “Custom” and check “perform clean installation” (when you see below two screens) while installing the driver.

 (58 votes, average: 4.74 out of 5)