Since Windows 10 released, the universal Skype app that comes preinstalled on all Windows 10 PCs has been horrible than ever. It looked incomplete, sluggish and was missing out on lots of functions. It did enhance a bit with time, but it never ever managed to lose that “incomplete” look that made the overall experience feel rough.
Admitting the fact that Skype sure is making our lives easier, there are also times when you can’t connect to Skype, and you’re seeing the message saying “Sorry, we couldn’t connect to Skype”. Many Windows 10 users are reporting this problem so if you encounter this message, don’t panic because you’re not the only one and it’s possible to fix.
Try the methods mentioned below to fix the issue.
Methods to fix Skype Connection Error
Method 1: Check Skype Heartbeat
If Skype is suddenly down, most of the case, the problem is not on your side. It could be Skype that is having issues. You can check Skype’s status by:
1. Open Skype. Click Help, then Heartbeat.
2. You’ll see Skype’s system status from the newly opened web page. If something is wrong with Skype, you’ll see the message here.
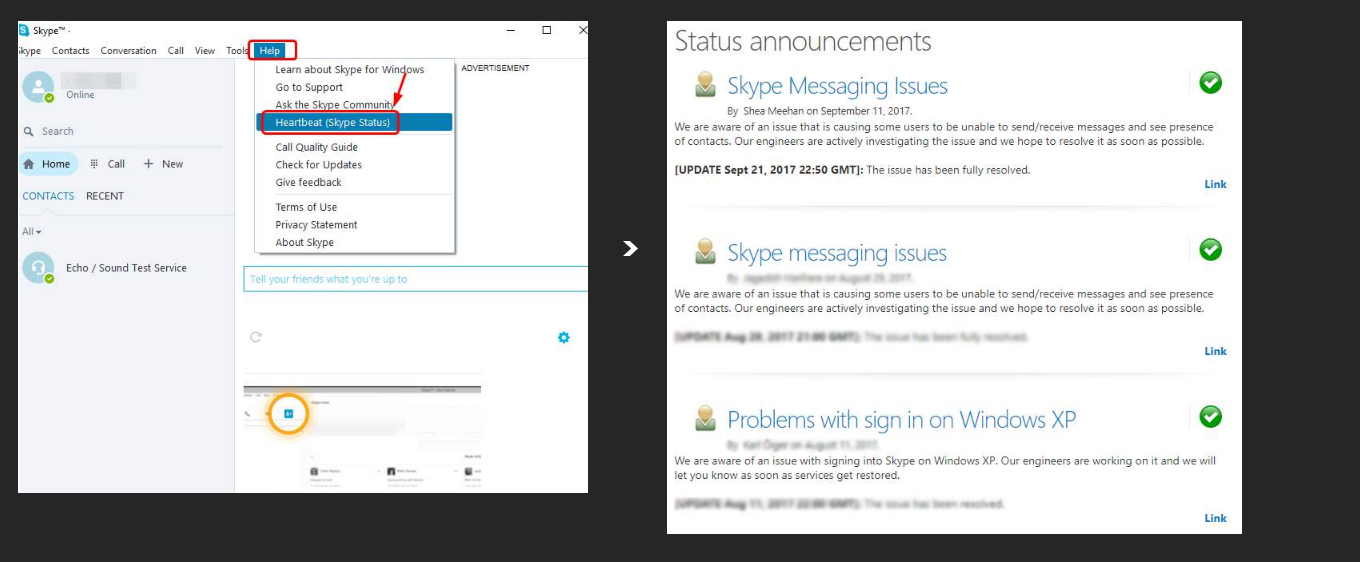
3. If you do see message concerning connection problem, all you can do is to wait for Skype technicians to solve it on their end.
Method 2: Configure Your Firewall
Your firewall might be a fault if your Skype still says “Sorry, we couldn’t connect to Skype“ even after the technician’s help.
Configure it to let the Skype app work well:
- Close your Skype app and make sure it is not running in the background (Task Manager will help you close the programs running in the background).
- Open your firewall and find the list of applications installed on your PC.
- Search for the Skype entry and allow Skype to connect to the Internet.
- Save the changes
- Restart Skype
If the app keeps experiencing connectivity issues, read the next method to fix the issue.
Method3: Refresh Network Settings
If you’re overloading your bandwidth by downloading files, you’ll have poor Skype connection. You can close all programs that require intensive network usage to see if the problem is resolved. Or you can refresh your network settings to get it solved:
1. On your keyboard, press Windows key and X at the same time, then click Command Prompt (Admin).
When prompted to give administrator permission, click Yes.
2. Type the following commands. Make sure that you have made no typo and then press the Enter key on your keyboard after each command.
ipconfig /release;
ipconfig /renew;
netsh winsock reset;
netsh int ip reset;
ipconfig /flushdns;
ipconfig /registerdns;
netsh int tcp set heuristics disabled;
netsh int tcp set global autotuninglevel=disabled;
netsh int tcp set global rss=enabled;
netsh int tcp show global
3. Restart your computer.
Method 4: Uninstall and Reinstall Your Skype
A really hard step to take where you might need to uninstall and reinstall your Skype in order to beat its connection problems.
Back up your Skype history if you have something important to save from being deleted, to do that:
- Windows logo key + R.
- Type ‘%appdata%\skype’ into the Run box and click OK.
- Copy the My Skype Received Files folder and the ‘Your Skype Name’ folder.
- Move them to another location.
To uninstall Skype:
- Windows logo key + R
- Type ‘appwiz.cpl’ into the Run box
- Programs and features
- Right-click on Skype and click Uninstall/Change and follow the prompts to uninstall Skype.
- Go to C:\Program Files, find the Skype folder and the SkypePM folder and Delete them.
Method 5: Configure Skype Connection Settings
If you use a proxy server, configuring your Skype connection settings can reportedly make the ‘Skype can’t connect’ problem vanish.
To help your Skype app connect to your proxy server, do the following:
- Skype > Tools > Options > Advanced > Connection.
- Specify the exact proxy option.
- Enter its Host and Port details.
- Enter your proxy Username and Password.
- Tick Enable proxy authentication
- Save your changes
- Close Skype (Make sure it is no longer running in the background)
- Now restart Skype and check if it is OK.
Method 6: Check for Available Windows Update
Outdated Windows Patches can be the cause of this problem. You can check for available updates by:
1. Press the Windows + I keys simultaneously.
2. Click Update & security.
3. Click Check for updates.

4. You may need to restart your PC for the changes to take effect.
5. See if your Skype is connecting now.
Method 7: Update Network Adapter Drivers
Outdated or dodgy network adapter drivers can cause Skype connection problems. In order to get the app back on track, you should resolve your driver issues.
Here is how to do that:
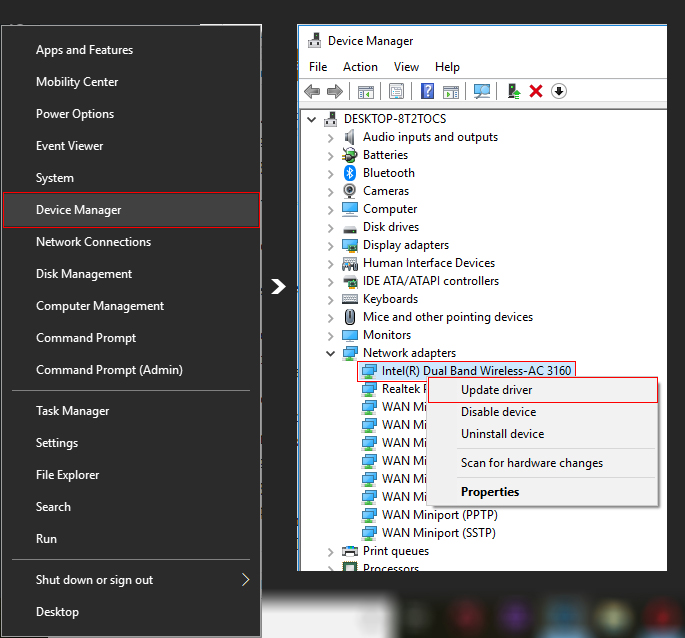
- Windows logo key + X > Device Manager
- Network Adapters > Right-click on the adapter of the drivers you wish to update and click Update.

- Wait for the process to finish.
- Restart your PC.

 (99 votes, average: 3.20 out of 5)