DHCP is not enabled for WiFi or “DHCP is not enabled for “Wireless Network Connection” can prevent you from connecting to the Internet. DHCP stands for Dynamic Host Configuration Protocol, which is a standardized network protocol that assigns reusable IP addresses within a network.
Methods to Fix DHCP is Not Enabled for WiFi Issue
Change Network Adapter Setting
- Right click the Internet icon, and select Open Network and Sharing Center.
- Click Change adapter settings.
- Right click WiFi (or Wireless Network Connection), and click Properties.
- Double click Internet Protocol Version 4 (TCP/IPv4).
- Check Obtain an IP address automatically and Obtain DNS server address automatically. Then click OK.
- Click OK on the WiFi properties window.
- Restart your computer.
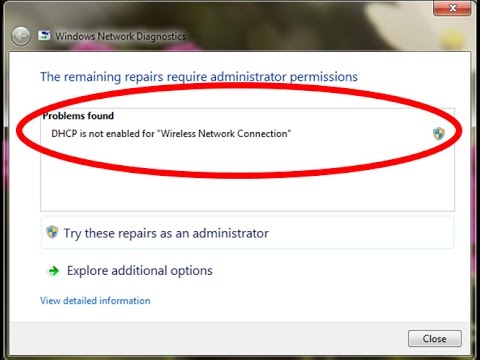
Windows Network Diagnostic Tool
- Press Windows + R to open the Run Window.
- Type ncpa.cpl and hit enter to open the Network Connections Window.
- Right click on your wireless connection and select Diagnose.
- Your issues will be identified and listed.
- Click on Next to start fixing the issues found. Click on Try This Repairs as an Administrator and let Windows attempt a fix.
- Click Apply this Fix on the next prompt.
- Click on close and check if your issue has been resolved.
Enable DHCP Client Service
- Press Windows + R at the same time to invoke the Run box.
- Type services.msc, and hit Enter.
- Double click DHCP Client.
- Select Automatic in Startup type, then click Apply, and click OK.
Disable Proxy
- Press Windows + R then type msconfig and click OK.
- Select boot tab and check Safe Boot. Then click Apply and OK.
- Restart your PC and once restarted again press Windows + R then type inetcpl.cpl.
- Hit Ok to open internet properties and from there select Connections.
- Uncheck Use a proxy server for your LAN. Then click OK.
- Again open msconfig and uncheck Safe boot option then click apply and OK.
- Restart your PC.
Uninstall and Reinstall Network Adapter
- Right-click on the Start Menu button click on Device Manager.
- In the Device Manager, double-click on the Network adapters section to expand it.
- Locate the network adapter, right-click on it and click on Uninstall.
- Check the Delete the driver software for this device option click on OK.
- Wait for the network adapter and its driver software to be completely uninstalled.
- After that click on Action > Scan for hardware changes. Windows will automatically detect and reinstall the network adapter and its drivers.
- Wait for the network adapter and its drivers to be reinstalled, and then restart the computer.
Update Your Network Adapter
- Press Win + X and select Device Manager.
- On the Device manager window, double click on the Network Adapter to expand it.
- Locate the network adapter, right click on it and then choose Update driver.
- Go on to choose Search automatically for updated driver software.
- Then Windows will search the update for you automatically.
Rate this Article: 
 (68 votes, average: 1.21 out of 5)
(68 votes, average: 1.21 out of 5)