Many users are experiencing ERR_NETWORK_CHANGED error while browsing net in Google Chrome. You may encounter error message:
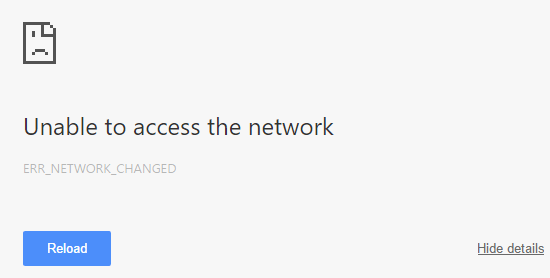
“Unable to access the network” ERR_NETWORK_CHANGED or “Your connection was interrupted. A network change was detected.” ERR_NETWORK_CHANGED
The error message clearly indicates that Chrome is Unable to access the network and hence the error. One of the reason reason causing this error to appear is related to a third party software installed on the PC causing the conflict with the internet connectivity.
Methods to Fix ERR_NETWORK_CHANGED
Method 1: Restart your modem
Sometimes just restarting your modem can fix this issue as the network might have experienced some technical problem which can only be solved by restarting your modem.
Method 2: Reset Tcp/Ip
- In the search box, type cmd
- In the results, right-click Command Prompt and select Run as Administrator.
- Inside the Command Prompt, paste the following command:
netsh int ip reset c:\resetlog.txt
Or if you don’t want to assign a directory path for the log file, copy and paste the following command instead:
netsh int ip reset
- After pasting the command, press Enter.
- Restart your computer.
- Go back to what you were doing and check if you’ve removed the tcpip.sys blue screen error.
Method 3: Clear Browser Cookies & Cache Data
- Open Google Chrome and type chrome://settings/cookies in the search bar and hit Enter.
- Now click the Remove all and then click Done button.
- Now check all the options in the box then click on the Clear browsing data.
- Close the Google Chrome browser and re-open the browser for checking the error.
Method 4: Lan Settings
- In Chrome click on the More Options menu and choose Settings.
- Go to Show advanced settings.
- Go to Network section and click on Change proxy settings.
- Click on LAN settings in connections tab.
- Uncheck the box that said Automatically detect settings.
- Uncheck Use a proxy server for your LAN and click OK.
Method 5: Delete WLAN Profiles
- Press Windows + X and choose Command Prompt (Run as Administrator).
- Type netsh wlan show profiles.
- Type the following command and remove all wifi profiles:
netsh wlan delete profile name=”[PROFILE NAME]”
- Do this for all the wifi profiles, and then reconnect to only your wifi.
Method 6: Reinstall Network Adapter
- Press Windows + X and choose Device Manager.
- Expand Network adapters dialog. Then right-click on your network adapter software and click Uninstall device.
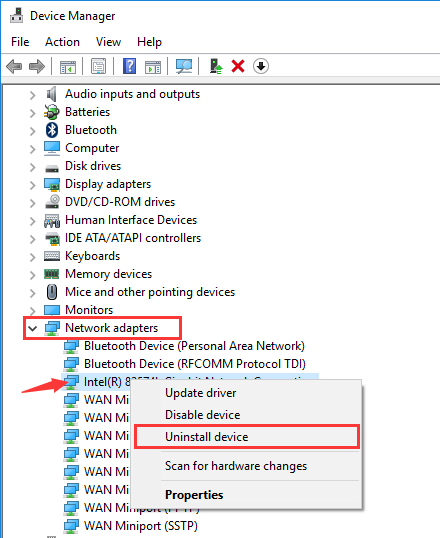
- Restart your Windows 10 and Microsoft might reinstall the driver for you.
Method 7: Change DNS
- Right click on the network option which you will see on the bottom right corner of your screen and select Open Network and Sharing Center.
- Click on the internet connection you are using.
- Click on Properties.
- Double-click on Internet Protocol Version 4 (TCP/IPv4) to change the DNS server.
- Click on Use the following DNS server addresses:and set the values as follows in the dialog box:
Preferred DNS server: 8.8.8.8
Alternate DNS server: 8.8.4.4
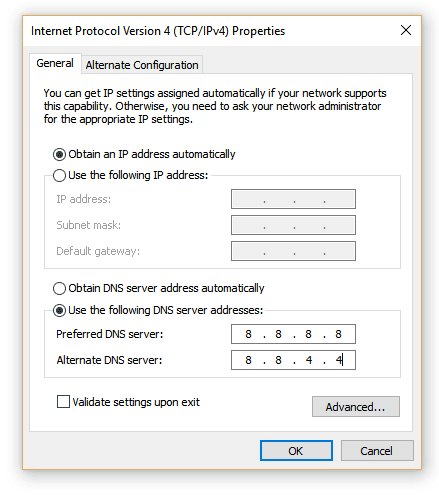
Press OK and exit.

 (59 votes, average: 4.53 out of 5)