This error 0x80070035 shows up when you can not access the network resources. This is a sort of complicated error, due to the fact that you might still be able to ping the resource which means, the resource is online and RDP into it, which means there is some access. But before you start, let’s ensure that you can ping the resource to ensure that is online. After you have ping ‘d the resource, and it is found to be online follow the listed methods below and stop at the one which repairs the problem for you.
Generally, the most common reasons for this error revolve around Firewall software, Anti-virus or DNS.
To flush off the error 0x80070035, you can use the methods mentioned below:
Method 1: Use IP address of the targeted computer
1. Press Windows + R key, then type in cmd.
2. In the command prompt window, type “ipconfig /all”
3. Scroll down to locate the category IPv4 Address. Mark down the address.
4. Then press Windows + R again. In the search box, type in the \\IPv4 Address\the drive you want to access. And then hit Enter. We are using \\194.167.63.162\c as an example.
5. You should be able to see that the C drive open just fine.
This is among the simplest of methods to eliminate error 0x80070035
Method 2: Check TCP/IP NetBIOS Helper service
In order for an internal network to function in a seamless manner, you’ll need to confirm that the TCP/IP NetBIOS Helper service is running in the background at all time. This service should be enabled to permanently run with the system, but there are reports that it stops after critical system changes imposed by Windows Updates causing error 0x80070035 to trigger.
Here’s how to check and re-enable TCP/IP NetBIOS Helper service:
In the Windows Search bar, type Services, and open Services from the list of the results.
1. Navigate to TCP/IP NetBIOS Helper.
2. Right-click on it and open Properties.
3. Under the ”Startup type” section, select Automatic and confirm changes.
4. Restart your PC and look for changes.
Method 3: Make sure your drive is shared
1) Right-click the drive and choose Properties. Let’s consider C drive on a virtual machine as an example.
2) Navigate to Sharing tab. If you see that the network path here says Not Shared, click Advanced Sharing tab.
3) Tick the box for Share this folder and then please make sure the Share name is correct. Then click Apply and OK to save the change and exit.
4) Then press Windows + R at the same time to open the run command. Type the name of the folder in the search box and hit Enter. You should be able to access this folder correctly now.
Method 4: Change Network Security settings
If the above two methods did not help and error 0x80070035 still pops up, then you should check whether the problem was on your network connection.
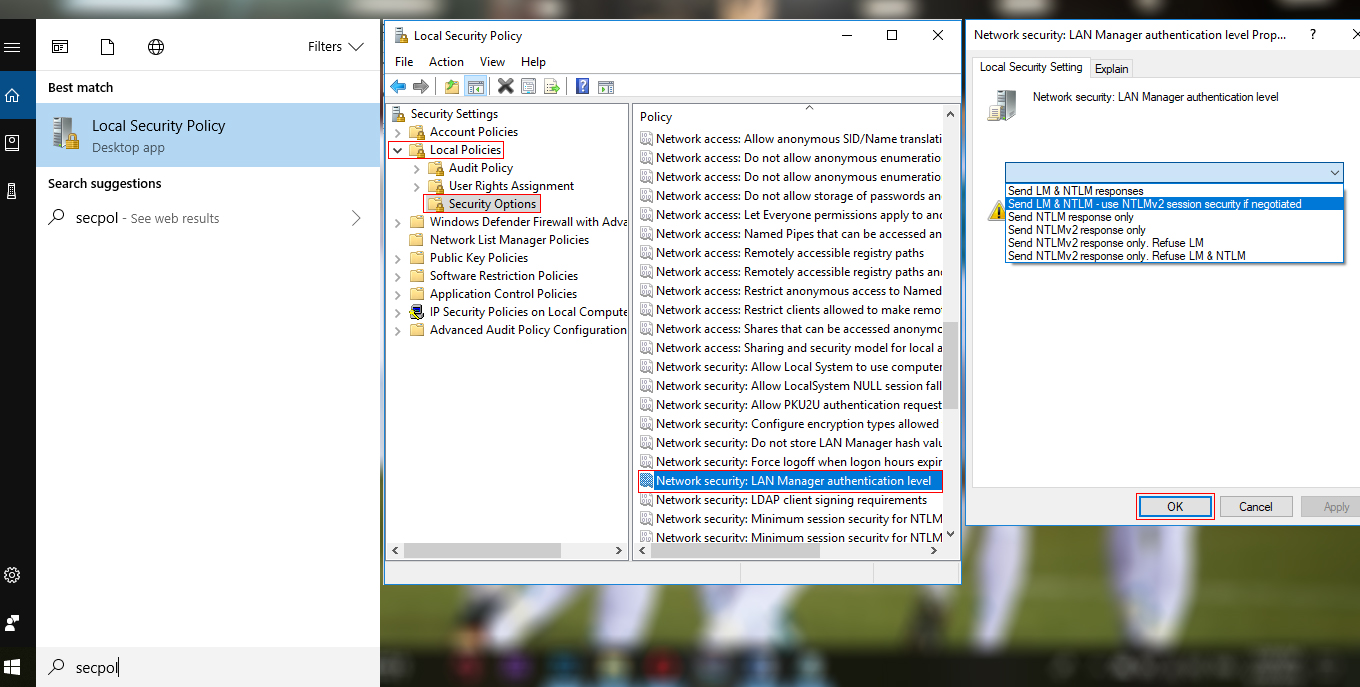
1. Search secpol.msc in the search box and hit Enter.
2. Then follow the path: Local Policies > Security Options > Network security: LAN Manager authentication level. Double click the option Network security: LAN Manager authentication level.
3. Then choose from the drop-down menu Send LM & NTLM-use NTLMv2 session security if negotiated. Then choose Apply and OK to save the change.
Method 5: Enable NetBIOS
Another thing which should capture your attention once the error 0x80070035 emerges is to NetBIOS over TCP. The error itself implies that this feature is disabled and, by enabling it, you should be able to address the error permanently.
Here’s how to enable NetBIOS over TCP:
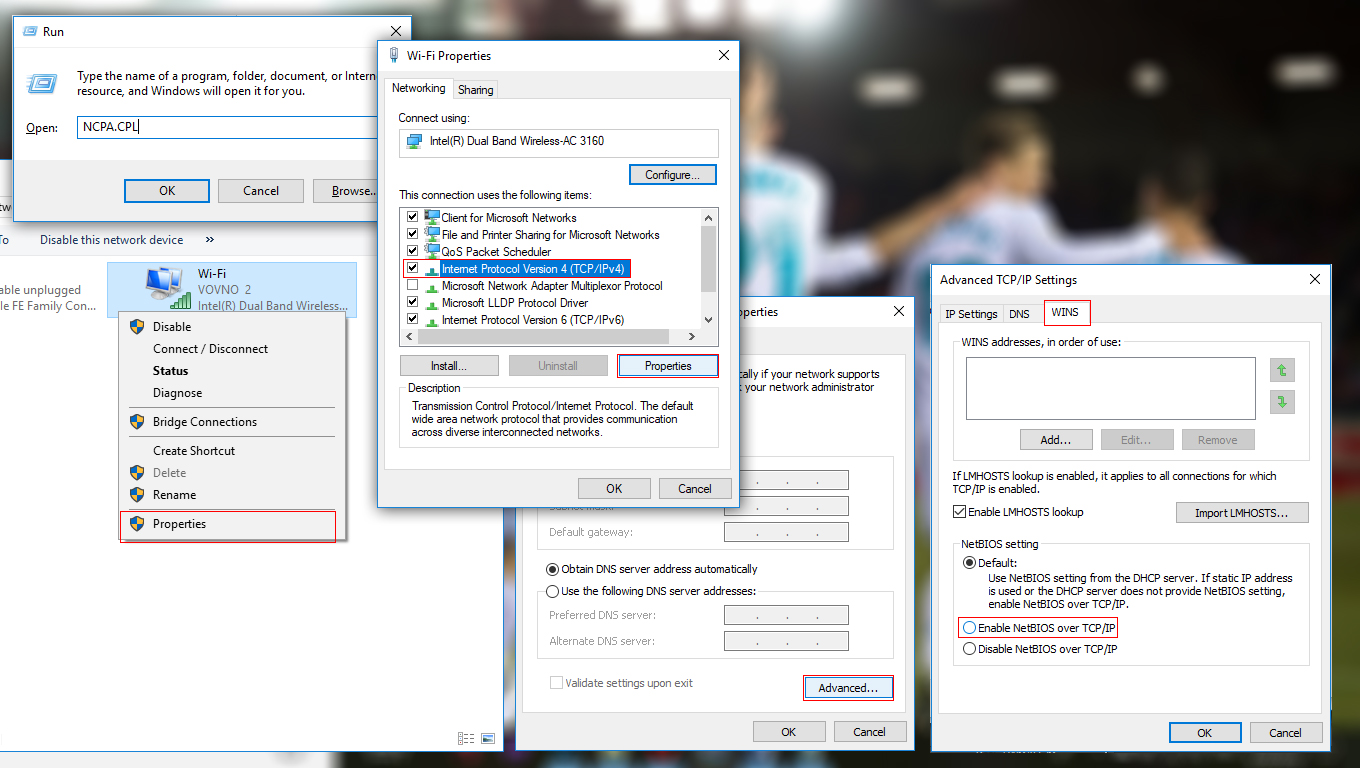
1. Press Windows key + R to open the Command Window.
2.In the Command Window, paste NCPA.CPL and press Enter.
3. Right-click on your default network and open Properties.
4. Select Internet Protocol Version 4 (TCP/IPv4) and click on Properties below.
5. Select the WINS tab.
6. Click on ”Enable NetBIOS over TCP” and confirm changes.
Method 6: Check Device Manager
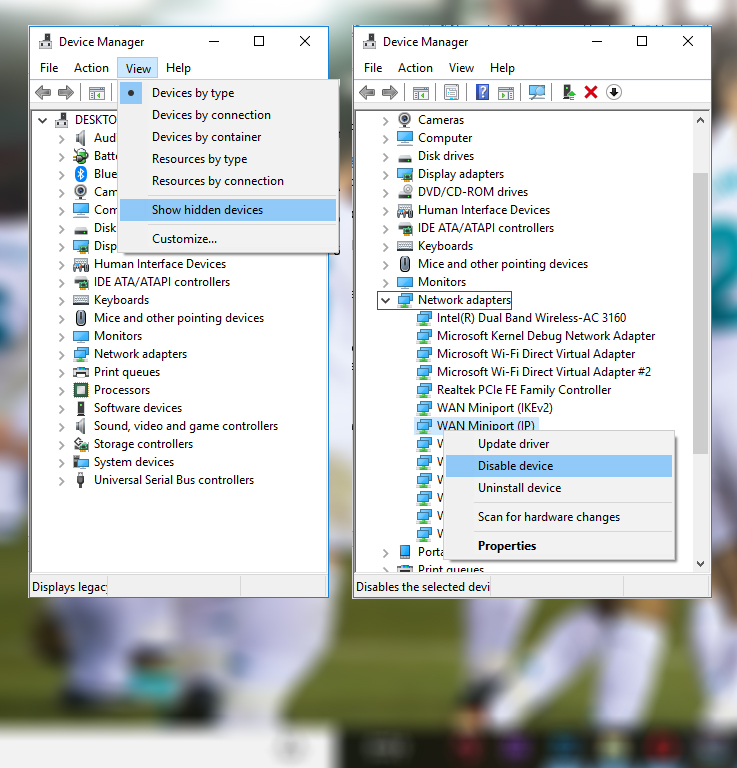
1. Go to Device Manager and expand Network Adapters.
2. Click view from the top and select show hidden devices.
3. Look at the adapters, if you see a long list of 6 to 4 Adapter, right click on them and delete all of them except 4. Once you have only 1 of these adapters left, reboot PC and test.
Method 7: Run SFC scan
This is a kind of troubleshooter we’re going to try which is known as SFC scan. This is Windows 10’s built-in ‘behind the scenes’ troubleshooter designed for resolving various system issues.
Here’s how to run the SFC scan:
1. Go to Search, type cmd, and open the Command Prompt as Administrator.
2. Type in the following command and press Enter: sfc/scannow.
3. Wait for the process to finish (it will take some time).
4. Restart your computer.
Method 8: Reset the Windows 10 Update components to get rid of error 0x80070035
The next method is resetting the Windows 10 update components. As the name says, this is an assemblage of components that basically makes downloading and installing Windows updates possible.
So, if we reset these components, there’s a good chance we’ll resolve our update problem. Here’s what you should do:
1. Go to Search, type cmd, and open the Command Prompt as Administrator.
2. Now, type in the following commands and press Enter after each one:
net stop wuauserv

net stop cryptSvc

net stop bits

net stop msiserver
3. The next thing we’re going to do is renaming the SoftwareDistribution and Catroot2 folders by typing the commands below in the Command Prompt then press Enter after each command you type:
Ren C:\Windows\softwareDistribution SoftwareDistribution.old

Ren C:\Windows\System32\catroot2 Catroot2.old
4. And finally, we’ll conclude the process with restarting the BITS, Cryptographic, MSI Installer, and Windows Update Services:
net stop wuauserv

net stop cryptSvc

net stop bits

net stop msiserver
5. Now, close the Command Prompt, and restart your computer.
Method 9 – Whitelist the Windows Update servers
If you can’t install Windows updates, there’s also a chance your system blocks the Windows Update servers. So, make sure to whitelist them:
1. Go to Control Panel and open Internet Options.
2. Head over to the Security tab from the upper menu of the Internet options window.
3. Select the Trusted Sites option from the Security window, and click Sites.
4. Uncheck the Require server verification (https:) for all sites in this zone feature.
5. You will now have a box there that says Add this website to the zone. Type in the following addresses: http://update.microsoft.com and http://windowsupdate.microsoft.com
6. Click the Add button after you typed in the addresses above.
7. Save the settings and restart your computer.
Method 10: Run the Update Troubleshooter
Chance are, you’re using at least Windows 10 Spring Creators Update (2017). Starting from this version, there’s a simple troubleshooting tool for dealing with various issues like error 0x80070035, including our troubles with Windows Update. Here’s how to run it:
1. Go to the Settings app.
2. Head over to Updates & Security > Troubleshoot.
3. Now, click Windows Update, and go to Run the troubleshooter.
By the time you’ve reached the last method, most probably the error 0x80070035 would have vanished.

 (58 votes, average: 4.53 out of 5)