The error code 0x80244010 depicts WU_E_PT_EXCEEDED_MAX_SERVER_TRIPS and happens when a client has exceeded the number of trips allowed to a WSUS server. The maximum number of trips is 200 within the code and it cannot be reconfigured. A “trip” to the server consists of the client going to the server and saying give me all updates within a certain scope. The server will give the client a certain number of updates within this trip based on the size of the update metadata. The server can send 200k worth of update metadata in a single trip so it’s possible that 10 small updates will fit in that single trip. Other larger updates may require a single trip for each update if they exceed the 200k limit. Due to the way Office updates are published you are more likely to see this error if you’re syncing Office updates since their metadata is typically larger in size.

Error 0x80244010 – Exceeded Max Server Round Trips Error in Windows 10
This creates chances for the user to encounter 0x80244010 Exceeded Max Server Round Trips Error due to the way “Windows Updates” are released.
Methods to fix Error 0x80244010
Method 1: Reset the Database
Few users report that even after retrying the scan, the 0x80244010 “Exceeded Max Server Round Trips” Error continues to show up on Windows 10 OS. So, in such case, try to reset the database and to do so, pursue the given steps.
- First and foremost, launch “elevated Command Prompt” to reset the database.
- Type or copy/paste the below-mentioned commands and hit Enter after inserting each command.
net stop bits
net stop wuauserv
- Moving ahead, open File Explorer and navigate to C:\Windows\SoftwareDistribution. In the folder, clear the entire contents of the “SoftwareDistribution” folder.
- Then, go to C:\Windows\WindowsUpdate.log and rename it as WindowsUpdate.log.old.
- Once you do this, re-launch Command Prompt window and insert the given syntaxes.
net start bits
net start wuauserv
Method 2: Configure Detection Frequency
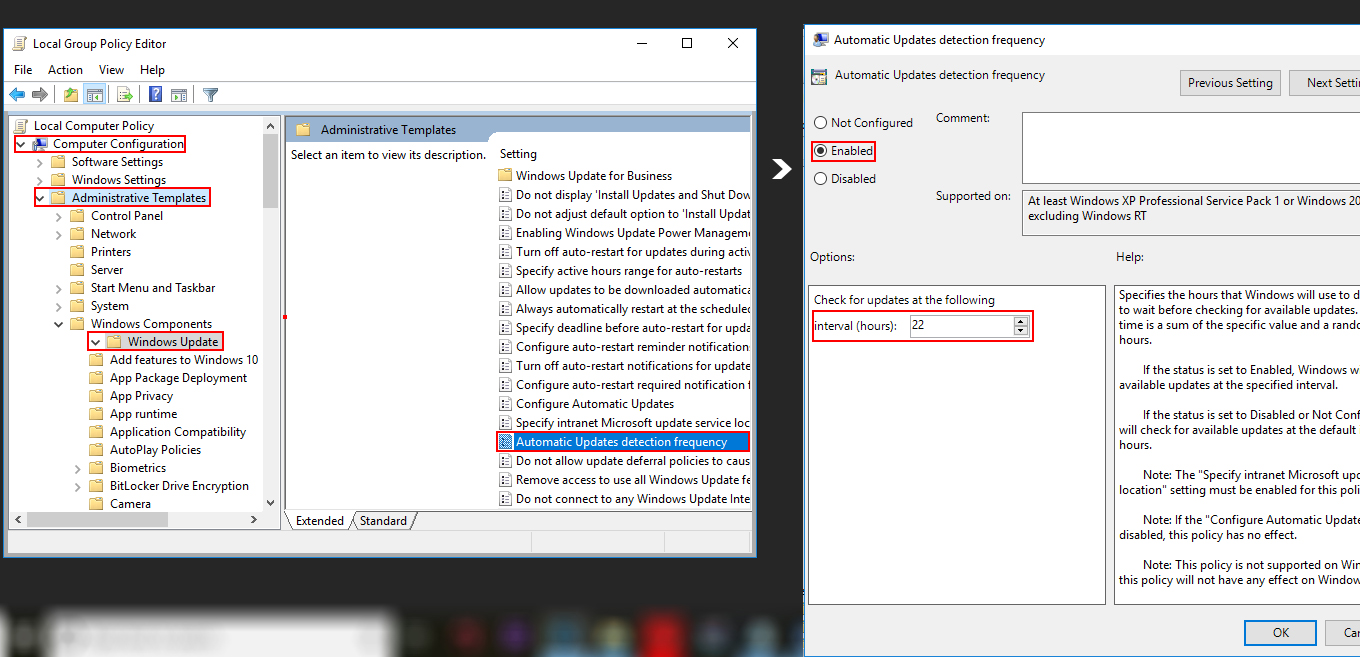
- Type in gpedit on Cortana text field and hit Enter to launch “Group Policy Editor” on the PC screen. Once you see it, navigate to the given path on its left portion.
Computer Configuration => Adminsitrative Templates => Windows Components => Windows Update.
- Switch to the corresponding right pane of Windows Update. Here, locate and double-click the policy setting namely “Automatic Update detection frequency“.
- When the details window comes up, select Enabled and enter the detection frequency in the field and click OK to save changes.


 (57 votes, average: 4.67 out of 5)