The Error 0x80070091 is generally associated with system restore but sometimes we also get this error while deleting a folder as well. However, nothing to worry about, as this error can be fixed in just minutes.
Error 0x80070091 The directory is not empty
It generally happens when you try to delete a folder from your hard disk, pen drive or cd. Before you begin just try to restart your computer and try and even try to rename the folder Sometimes, this problem can be fixed just by renaming the folder. However, if you are unable to rename, these suggestions may help you.

Error 0x80070091
Run Check Disk
You can run check disk for Bad sectors on the hard drive. To run chkdsk scan:
- Open Command Prompt as administrator.
- Now enter
chkdsk /f C:
command. - You’ll be asked to schedule a disk scan at next reboot. Enter Y and press Enter to confirm.
- Restart your PC.
Kindly do not shut down the computer during this process. After the whole process is finished, you would be able to delete that folder.
Restart Windows Explorer
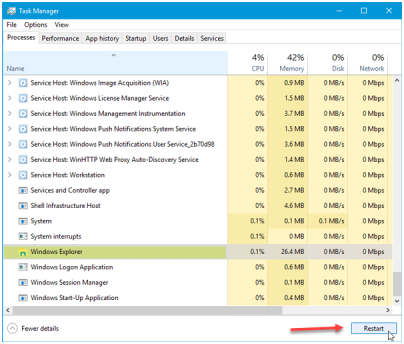
Sometimes strings get attached internally. Therefore, you can try to restart Windows Explorer and then try to delete the folder.
To do so, open Task Manager on your machine and be on the Processes tab.
Scroll down until you get Windows Explorer.
Select it and click on the Restart button visible in the bottom-right corner of Task Manager.
Remove Junk Files
Sometimes the pile of junk files cause such kind of errors on the drive. You can try to delete them to solve the error 0x80070091
- Press Win + X key to open up menu
- Select “Command Prompt (Admin)” option.
- Click “Yes” to run command prompt as an administrator.
- Type “cleanmgr” before hitting Enter.
- The tool will begin to run automatically and will calculate how much-used space you can claim on the hard disk. Check all the dialogue boxes occupied by unnecessary files including the temporary files box.
- Click “OK” to let the tool remove all junk files.
- Attempt again to delete a file or folder you intended to delete to see if the 0x80070091 error is resolved or not.
Own The File/Folder
It is possible that you may not have proper rights to delete a folder. Make yourself the owner by following the steps below:
- Click to open Windows Explorer.
- Open the parent directory of the file or folder you intend to delete.
- Right-click on the file or folder before selecting its properties.
- Click on its security tab> Advanced> Owner.
- Change the file’s or folder’s ownership to “New Owner“.
- Select “Replace Owner” in both “Sub-container and Objects“.
- Close before attempting to delete the file or folder to see if the issue is resolved.
System Restore Error 0x80070091
Many people have reported an error code 0x80070091 (a.k.a. ERROR_DIR_NOT_EMPTY) appearing when trying to perform a system restore. Here are some quick fixes for this error.

Error 0x80070091
Rename the WindowsApps folder in Safe Mode
Step 1: Boot your Windows 10 into safe mode:
i) Open run dialog box by pressing Windows key + R key together. Then type msconfig in the box and hit Enter.
ii) On the pop-up window, view on Boot pane.
Then tick on Safe boot and click OK.
Click Restart, if prompted by system configuration 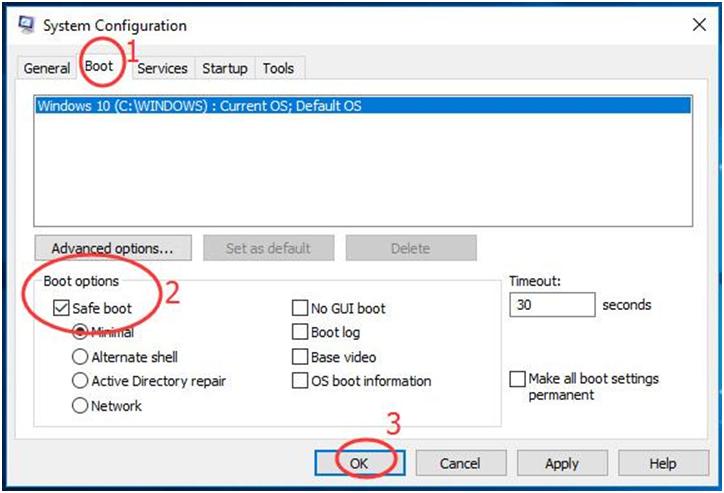 Then your Windows 10 would get into safe mode.
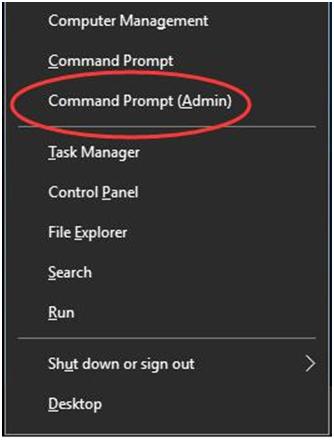
Step 2: Open quick-access menu by pressing Windows key + X key.
Then click Command Prompt (Admin) to run it as administrator. When prompted by User Account Control, click Yes.
Step 3: Type the following commands and hit Enter to run them one by one:
- cd C:\Program Files
- takeown /f WindowsApps /r /d Y
- icacls WindowsApps /grant “%USERDOMAIN%\%USERNAME%”:(F) /t
- attrib WindowsApps -h
- rename WindowsApps WindowsApps.old
Step 4: Follows the i) & ii) of Step 1 to open System Configuration Window. This time uncheck Safe boot to reboot your Windows 10.
Step 5: When it finishes rebooting, run System Restore again.
Rename the WindowsApps folder in WinRE
Step 1: Boot your Windows 10 into Windows Recovery Environment
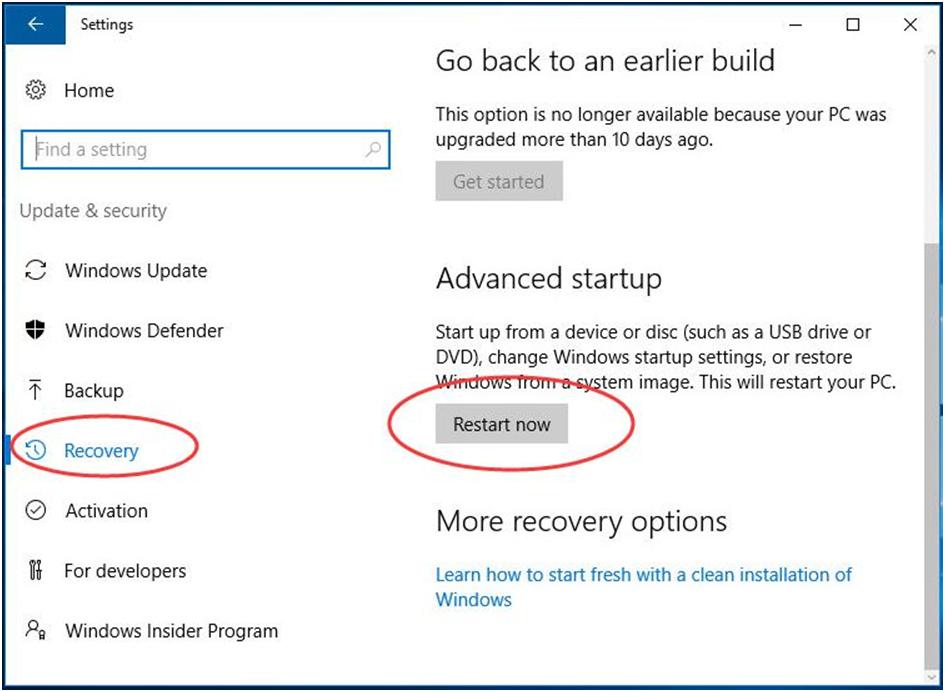
i) Open Settings Window by pressing Windows key + I key. Then click Update & security.
ii) Click Recovery. Then scroll down on the right side and click Restart now under Advanced startup.
iii) Click Troubleshoot > Advanced > Command Prompt.
Step 2: Type the following commands and hit Enter to run them one by one: • cd C:\Program Files • attrib WindowsApps -h • rename WindowsApps WindowsApps.old
3) Reboot your Windows 10, and then run System Restore again.
In 99.99% Cases this error is solved by above solutions, however, if you are still getting this error you can try the following methods which were found in some forums.
Run chkdsk scan
- Open Command Prompt as administrator.
- Now enter
chkdsk /f C:
command. - You’ll be asked to schedule a disk scan at next reboot. Enter Y and press Enter to confirm.
- Restart your PC.
Check your antivirus
Sometimes your antivirus may be causing this error in order to protect you from threats, However, you can try to disable it for sometimes and then try to run the system restore again.
Run DISM Tool
1. Press Windows Key + X and click on Command Prompt(Admin).
2. Type the following and press enter:
DISM /Online /Cleanup-Image /RestoreHealth
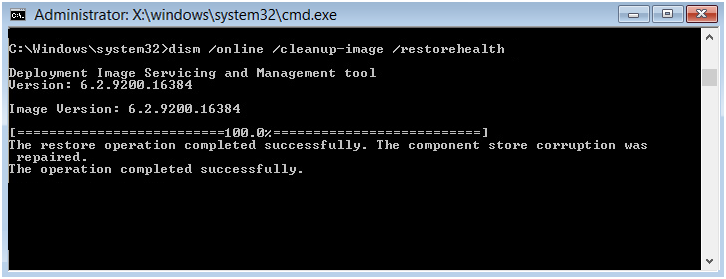
3. Let the DISM command run and wait for it to finish.
4. If the above command doesn’t work then try on the below:
- Dism /Image:C:\offline /Cleanup-Image /RestoreHealth /Source:c:\test\mount\windows
- Dism /Online /Cleanup-Image /RestoreHealth /Source:c:\test\mount\windows /LimitAccess
Note: Replace the C:\RepairSource\Windows with the location of your repair source (Windows Installation or Recovery Disc).
5. Reboot your PC to save changes.

 (53 votes, average: 4.74 out of 5)