Error code 0x8007001f appeared for numerous users when they tried to install the Anniversary Update (build 1607). It is in fact a generic error message, however this error suggests either an issue with a link in between 2 drives, or sometimes, a problem with the audio driver. Furthermore, 0x8007001f error is accompanied by other signs such as lack of a Bluetooth connectivity and lack of sound. Mainly, it occurs due to a defective audio driver or a compatibility issue between Windows 10 and your computer’s hardware.
Causes of Error 0x8007001f
- Disabled Volume shadow copy option that System Restore is linked to.
- Executed Windows Update files.
- Automatic Windows Updates.
- Incompatible or out of date audio drivers.
Fixing Error 0x8007001f
Method 1: Run Windows Troubleshooter
- Press Windows key + I and open Update & Security
- Select Troubleshoot and find Windows Update.
- Click Windows Update and select Run troubleshooter.
Method 2: Use Audio Troubleshooter
- Click on the Windows key and search “audio troubleshooter“.
- Select the option titled, “Find and fix audio playback issues“. A new troubleshooter window will open.
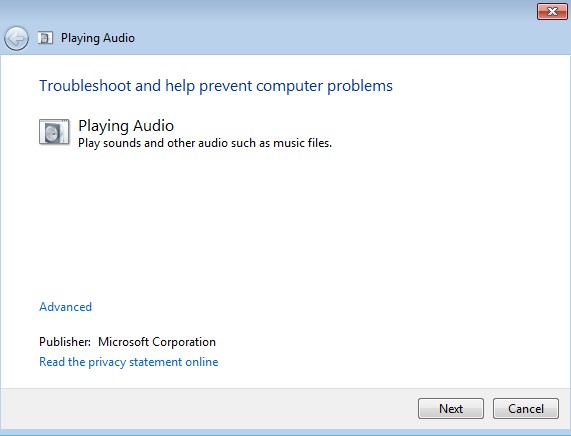
- Click on next, and the troubleshooter will find and fix any issues with your audio.
Once the process is completed, the error code 0x8007001f will be fixed.
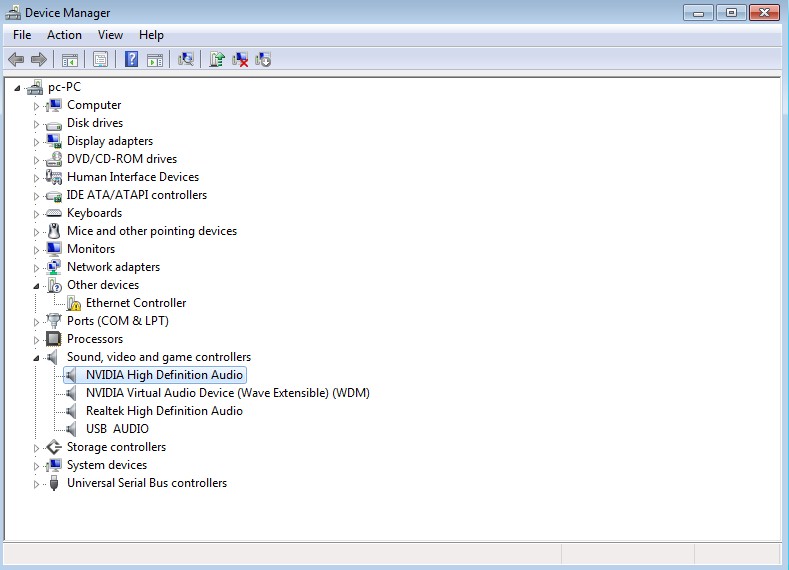
Method 3: Update Audio Drivers
- Press Win key, type Device Manager and select the first option from the search results.
- Expand Sound, video and game controllers on the left side and select IDT High Definition Audio CODEC.
- Click Action tab and select Update Driver Software.
- After that, select Browse my computer for driver software and select High Definition Audio Device driver from the list.
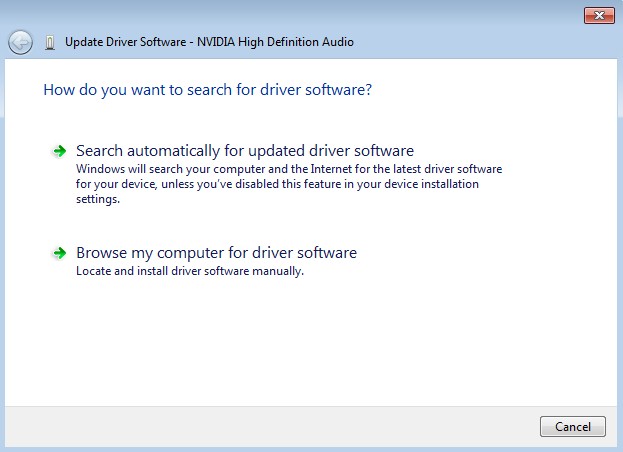
- Click Next and then Yes.
- When the process is finished, restart your PC.
Method 4: Remove Problem Causing registry Entries
- Press Win + R
- Input “regedit” and hit the Enter key
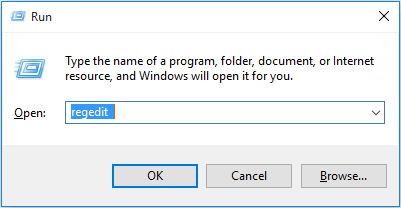
- Go to the following location HKEY_LOCAL_MACHINE\COMPONENTS\
- Remove the below listed entries:
- AdvancedInstallersNeedResolving
- PendingXMLIdentifier
- NextQueueEntryIndex
- Reboot the PC
Method 5: Clean Boot Windows and Install the Anniversary Update
- Disable or completely uninstall all antivirus software.
- Press Windows + R, and type in devmgmt.msc then press Enter.
- In the Device Manager, scroll down to Universal Serial Bus Controllers. Expand it, and right click then disable every unnecessary USB device, such as a card reader or similar. Close the Device Manager.
- Right click on the Taskbar, and open Task Manager. Navigate to the Startup tab, and click on each item, then on Disable in the lower right corner, until all items are disabled.
- Press Windows + R again, type in msconfig, press Enter.
- Go to the Services, make sure that Hide all Microsoft services is checked, and only then you can select Disable All.
- Now you can reboot and you have a clean boot environment.
- If you have any unnecessary USB devices that are plugged in, such as CD/DVD drives, or external media like a USB flash drive, an external hard disk, or even video game controllers, disconnect them all.
- If you’re utilizing an ISO to update, either from a storage device such as a DVD or USB, disable your Internet connection by either unplugging the Ethernet cable, or turning off your Wi-Fi.
- If you’re upgrading through Windows Update, ensure the downloading progress gets to 100%, then you can disconnect your Internet.
- By following the steps above, you will manage to install the Anniversary Update.
Rate this Article: 
 (63 votes, average: 4.68 out of 5)
(63 votes, average: 4.68 out of 5)