A number of Windows users who attempted to update their Windows 10 OS recently, have come across the irritating 0x80240fff error code. With plenty system update issues and errors that have ever occurred and are occurring to normal Windows users, it’s still a mainstream to update Windows into the latest version – Windows 10. Inability to install updates not just stops users from using all the latest functions and enhancing their work.
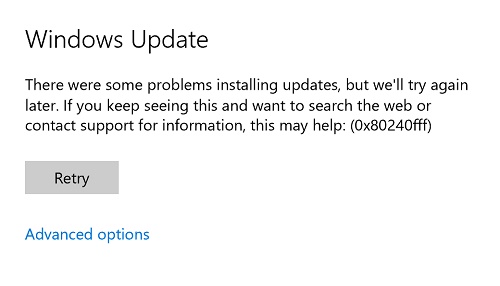
Error Code 0x80240fff is rather common for Windows 10 users, particularly those who work with Windows 10 build 10240. Error 0x80240fff, it prevents the system from looking for the available updates. Consequently, users can not download and install them. Microsoft explains that this error could be associated with the matching Product and Category names. For example, you create a product within SCUP called “Tools”. This puzzles the system when assessing the categories because you now have a product named “Tools” and an update category called “Tools”.
Fixing Windows 10 Update Error Code 0x80240fff
Method 1: Windows Update Troubleshooter
- Press Windows + X and select Control Panel.
- In the search bar type “troubleshoot”. When Troubleshooting appears on the list, click it.
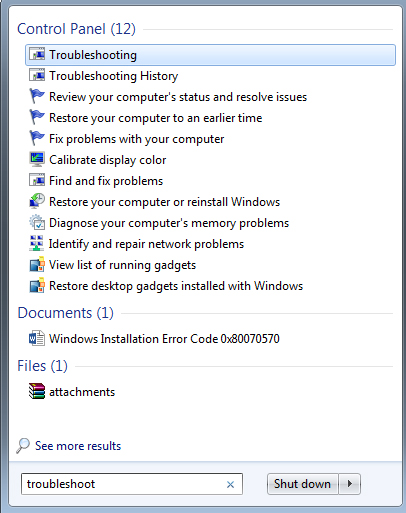
- Click Fix problems with Windows Updates which is under the System and Security.
Your computer must be connected to the Internet.
Method 2: Disable your VPN Software
Some users established that shutting off VPN software helped them repair error 0x80240fff. So, if you do use a VPN software program, disable it and then check for updates.
Method 3: Restart the Background Intelligent Transfer Services
- Press Windows key + R key, and type services.msc in the text box.
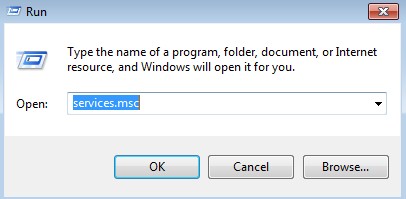
- Locate Background Intelligent Transfer Service (BITS) on the list.
- Right-click the Background Intelligent Transfer Service (BITS) service, and then click Properties.
- On the General tab, next to Startup type, make sure that Automatic (Delayed Start) is selected. If it isn’t, select it, and then click Apply.

- Next to Service status, check to see if the service is started. If it isn’t, click Start.
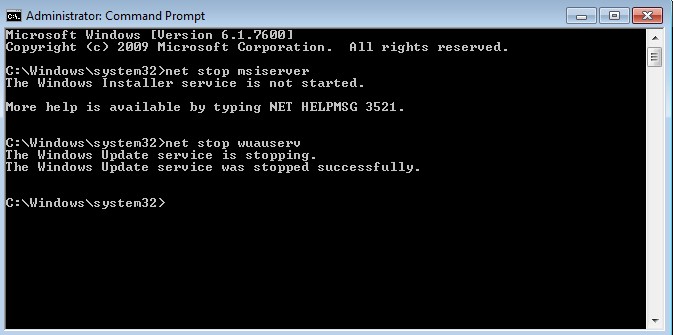
Method 4: Reset Windows Update Services
Resetting Windows Update components generally does the job with the majority of the error messages that keep on appearing as long as the message is not associated with an issue with Microsoft servers.
- Type Command Prompt in the search bar and run it with administrator privileges.
- Kill the following processes: MSI Installer, Windows Update Services, BITS, and Cryptographic by copying and pasting the commands below. Make sure you click Enter after each one:
net stop msiserver
net stop wuauserv
net stop bits
net stop cryptSvc
- Rename the Catroot2 and Software Distribution folders. You can do this more easily by copying the following commands in the Command Prompt:
ren C:\Windows\SoftwareDistribution SoftwareDistribution.old
ren C:\Windows\System32\catroot2 Catroot2.old
Start the MSI Installer, Windows Update Services, BITS, and Cryptographic services again by copying and pasting the commands below one after another.
net start wuauserv
net start cryptSvc
net start bits
net start msiserver
- Restart your computer after this and check to see if your problem is solved.
Method 5: Suitable for Windows 10 Pro Users
- Go to Windows Update Settings.
- At the bottom of the page look for Advanced Options and click it.
- Select Defer Updates.
- Try installing updates again.
Method 6: Turn off Firewall Protection or Antivirus
In some cases your security software (firewall, antivirus and antimalware tools), might obstruct Windows Update. The quickest and easiest approach to repair this issue is to temporarily disable these programs. Then try to install the most recent Windows updates once again to check if this solution repaired your problem.

 (52 votes, average: 4.46 out of 5)