“Windows 10 won’t shut down” is one of the problem with windows which many users have experienced. Some users experienced this problem after the Creators Update, the Windows 10 Fall Creators Update, the Anniversary Update or a fresh install of the new Windows operating system.

In newer version of windows Microsoft has added a new method of shutdown called Hybrid shutdown. Hybrid shutdown decreases the shutdown time by hibernating the kernel session instead of completely closing it. This will also decrease the booting time because when the PC is powered on again, the kernel session is revoked from the hibernation. Apart from increasing the performance Hybrid Shutdown feature may also cause some errors or even prevent Windows from shutting down completely. Many computers will freeze or hang when you try to shutdown because of the Hybrid Shutdown feature.
You can try the following solutions to overcome this problem.
Method 1: Turn Off Fast Startup Feature
- Press Windows + I key to open the Settings window. Then click System.
- Click Power & sleep > Additional power settings.
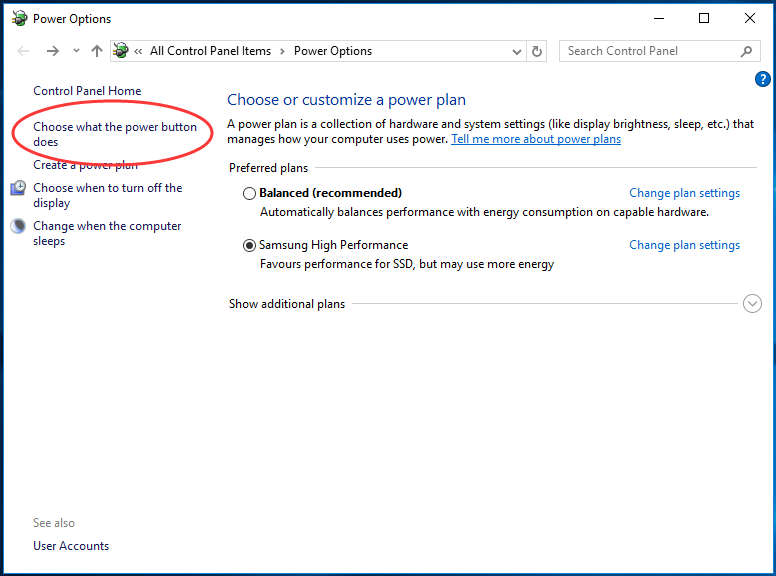
- On the left side of the window click on Choose what the power button does.
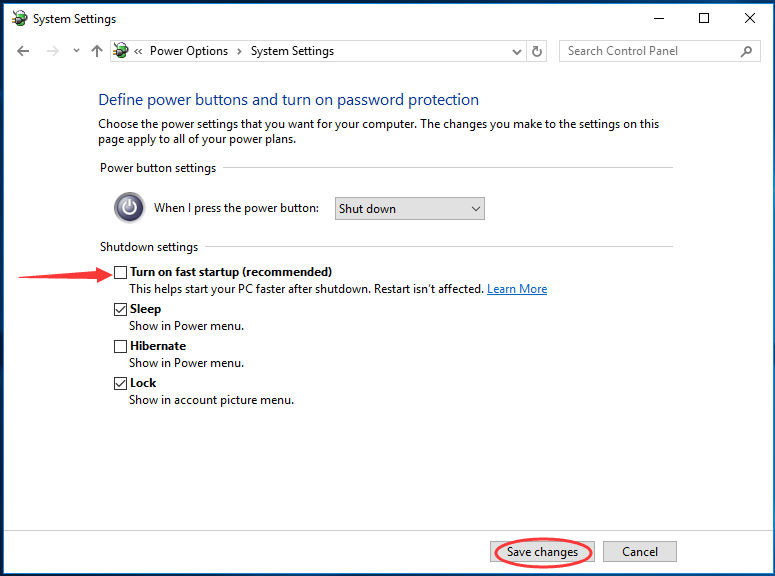
- Click on Change settings that are currently unavailable, under Define power buttons and turn on password protection.

- Uncheck Turn on fast startup. Then click Save changes.
- Now try to shutdown and see if it helped.
Method 2: Perform a Full Shutdown
- Right-click on your Desktop.
- Go to New and click on Shortcut.
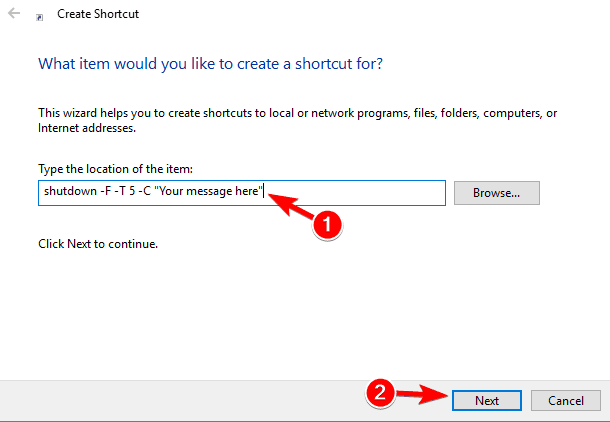
- For Type the location of the item input this:
shutdown -F -T ## -C “Your message here” (## can be any number and “Your message here” could be any text you want)
- Click Next after this.
- Name the shortcut whatever you want to and click Finish.
- After doing that, simply click the newly created shortcut to perform a full shutdown.
Method 3: Run Windows Update Troubleshooter
Some users reported that sometimes problems with windows update can cause this problem.
- Open Control Panel and select Troubleshooting from the list.
- In the menu on the left select View all.
- Select Windows Update from the list.
- When Troubleshooter window opens, click on Advanced. Now click on Run as administrator.
- Troubleshooter will now restart. Click on Next to start the scan.
Method 4: Reset Your Power Plan to Default
- Open Control Panel and go to Power Options.
- Locate your current power plan and click Change plan settings next to it.

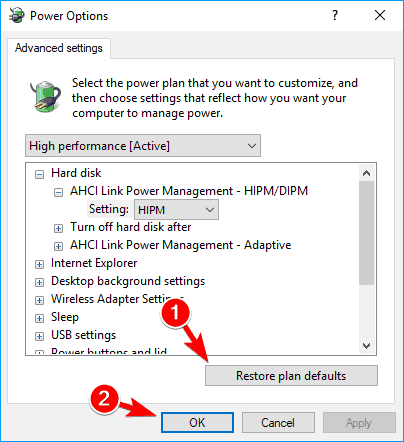
- Click on Change advanced power settings.
- Now click on Restore plan defaults Click Apply and OK to save changes.
Method 5: Change Intel Management Engine Interface Settings
- Press Win + X and Select Device Manager.
- Expand the System devices
- Navigate and double-click the Intel Management Engine Interface.
- Choose the Power Management tab.
- Uncheck the Allow the computer to turn off this device to save power.

 (47 votes, average: 4.74 out of 5)